Saturday, December 31, 2011

Cupcakes for a Sweet 2012


Happy New Year from the Baking Sisters! It's a fun and festive holiday that gives me an excuse to dress up, wear my awesome sparkly headband from J. Crew, and of course bake like a maniac! Tonight, I'm headed to a party, and when I saw these clock-themed New Years cupcakes in the Martha Stewart Cupcake Cookbook, I was intrigued. They are holiday-appropriate and not too tricky to make, although I have to warn that melted chocolate is not really amenable to being poured neatly out of a pastry bag, so I used a chocolate-dipped toothpick to make all the numbers, which was a pain, but whatever. For the cupcake recipe, I used this recipe, which is excellent! It's extremely fluffy and silky; my friend and co-baker Emily said that the batter was more the consistency of mousse, and I agree. I used the Swiss Meringue Buttercream, but as always, I used three sticks of butter instead of four, and it was still plenty buttery. Then I just melted an ounce of chocolate, and after several failed experiments with the pastry bag, I discovered the toothpick trick and all was well. Emily so kindly cut out the clock hands you see above, and I put foil on a cake plate to make the clock face. We're going to bring it to the party and reassemble the whole thing, cause we're ridiculous, in a good way. The Baking Sisters wish you a happy (and sweet) New Year!

Sunday, December 25, 2011

For a Sweet New Year, Honey Cookies


As we have written about before, there is a Jewish tradition to have honey on Rosh Hashanah, the Jewish new year, for a sweet new year. While this custom has not carried over into the secular world, I am very late in my blogging and so I am starting a new tradition-- honey for a sweet 2012!


These cookies come from the ever great Susie Fishbein, author of the Kosher by Design cookbook series. Somehow I ended up acquiring her latest cookbook, Kosher by Design: Teens and 20-Somethings. While I'm not won over by some of the recipes in the cookbook-- some of them are too unhealthy or too basic for my tastes-- I've also discovered a few recipes I really like, and this is one of them.


These cookies, despite their name, are actually more spice cookies than honey cookies, but I think they're delicious. They're really easy to make and mostly include ingredients you already have in the house. Just watch them while they bake or else they burn. Despite making three other desserts, these were the favorite. You can find the recipe here.

Tuesday, December 20, 2011

Adventures with the Ice Cream Maker: Dark Chocolate Sorbet


I come not to praise Dorie Greenspan's chocolate sorbet recipe, but to...okay, I come to praise it. There's just so much to praise!
1) It is easy-peasy lemon-squeezy. No warming milk and pouring warm mixtures onto egg yolks while whisking constantly and scraping things into other things. Just throw the ingredients together, heat 'em up, and blammo. You're all set to make your sorbet (after you chill the mixture and freeze your ice cream maker's bowl for at least 8 hours, of course).
2) It is deliciously creamy, even though the recipe includes no cream! Will wonders never cease? In fact, although the recipe doesn't call for any specific kind of milk, I've only ever used skim, and it's been as creamy as one could ask for.
3) As far as things this tasty go, it's relatively healthful, especially if you use skim milk. Great for keeping off those holiday pounds!!!! LOL!!!!!
4) Dark chocolate. Need I say more?
So this holiday season, enjoy a nice steaming freezing churned chocolate-water-milk-sugar concoction. It drive you to that other chocolate-water-milk-sugar concoction known as hot cocoa, but you won't regret it! You can find the recipe here.

Sunday, December 18, 2011

BAKED Sunday Mornings: Buckeyes


I have never made candy before, so I was a little nervous to make this week's recipe.  In fact, it almost didn't happen because I was afraid it might be too much work.  However, these buckeyes were easy-peasy.  The only complicated part of these is dipping them in the chocolate and even that wasn't so hard once I had some patience.


As my husband points out, these are a candy, named after a nut, named after an animal's eye.  However strange their origen/name, they were delicious.  If you like the combination of chocolate and peanut butter, you will enjoy these.  And if you are a candy making novice like me, start with these.  They might give you the confidence to move onto more complicated candy (and looking at the upcoming Baked Sunday Mornings recipes, I think I'm going to need that boost).


I made half the recipe and got 26 pieces.  Check out the other bakers over at the Baked Sunday Mornings website.


In other exciting news...2 of the three baking sisters will be reunited today when Rachel comes out to LA.  Hopefully we'll get to bake something fun together.

Wednesday, December 14, 2011

Pecan Pie for Beginners


Here I am again (see sisters!) Unlike Rebecca, I really like pecan pie, but I have a bit of a pie phobia because it always seems so complicated. Especially pecan pie, with all of its boiling corn syrup and other such things. So I was thrilled when I found this recipe by googling "easy pecan bars" and then reading reviews until I found something that seemed to be as good as the real thing. While I acknowledge that it is a lazy man's (or woman's) recipe, I thought that they tasted as good as regular pecan pie, but with way less work. If you're a purist, you can make your own crust (any sugar cookie recipe will do) but the mix worked as well-- I've made them twice, one time each way, and been happy both times.

One warning-- this are SUPER rich and sweet, so cut small and enjoy! And if you're going to save them for later, they keep best in the fridge. Give them a try; you'll be glad you did. You can find the recipe here.

Thursday, December 8, 2011

A Holiday Triple-Header From The Baking Sisters' Dad!


Ah, Thanksgiving: a weekend of gratitude, family, shopping (for some), football (for others), and food – too much food – for all. In addition to the traditional Thanksgiving dinner (at my sister- and brother-in-law’s home in Connecticut), our family has two long-standing rituals that involve food.
The first began more than 30 years ago, before any of the Baking Sisters were born. Because we live near the start of the Macy’s Thanksgiving Day Parade route, we used to take friends’ children to see the parade. After standing in the cold for several hours, we would return home to hot cocoa and chocolate chip cookies (we still use the recipe on the package of Toll House chips). This tradition continued during the many years when we stood on the parade route with the Baking Sisters. Now that they are grown, we watch the parade on television, but we still bring out the cocoa and cookies when Santa gets to Herald Square. Next year, we hope to restore the full tradition and take our grandson to see the parade live and in person! The other tradition goes back only 15 years or so. We attend the Big Apple Circus with close friends and then return home, build a fire in the fireplace (it was 60 degrees this year, but we have to make S’mores), eat plenty of wonderful food and go through several bottles of wine. So it was a busy weekend for the Baking Sister’s dad. I started with my traditional Vermont Pumpkin Pie, based on a recipe I clipped from the New York Times many years ago which I adapted to make the pie non-dairy. Beaten egg whites give the pie a light texture, while maple syrup adds New England-style sweetness that seems to be the essence of Thanksgiving. For the post-circus feast, I made Apricot Tarragon Cocktail Cookies, which go wonderfully with cheese and wine. I saw the recipe in Rebecca’s Food & Wine magazine when I visited California in October, and I was pleasantly surprised to discover that the recipe was contributed by Dorie Greenspan. Here is a link to the recipe. I went all-out for dessert. I always have canned pumpkin left over when I make the pumpkin pies, so I looked for a pumpkin ice cream recipe to use it up. I found a great one on David Lebovitz’s blog. As he suggests, I included rum and chopped pecans. And since it didn’t seem right to serve just ice cream, I also made Moosehead Gingerbread from Maida Heatter’s Book of Great Desserts. According to the book, the recipe came from an old-time fishing guide in Maine. In any event, the gingerbread and the ice cream were a great combination.

Monday, December 5, 2011

Mexican Chocolate Chip Cookies, or, The Return of the Rachel


I know. I am a delinquent. Sarah. feel free to berate me now. Between school, work, and figuring out what exactly I want to do with my life, I have had little time for baking and even less time for blogging. But I apologize for my neglectful ways and will try to do better in the future.

ANYWAY. I actually made these Mexican chocolate chip cookies almost two months ago, for the holiday Sukkot. Sukkot is always one of my favorite holidays-- I love eating outside in the sukkah and even the odd waving the large stick in the air ritual has found a fond place in my heart. This year I moved from sukkah to sukkah (or, since it rained almost the whole time, from house to house) and my job was often to bring dessert. Since I was off from school, I had a little more time than usual and decided to try making some new things (which will hopefully be posted about soon.)

I was excited about these Mexican chocolate chip cookies because I really like the combination of sweet and spicy-- think the old school hard candy fireballs-- and so I was excited to see how these would turn out. While I really liked the flavor, I found that they were a bit dry and crumbly, and became more and more so as the days passed. I think I would make them again, but would add more butter or milk next time to increase moisture. You can find the recipe here.

Saturday, December 3, 2011

BAKED Sunday Mornings: Baked French Toast


This recipe intrigued me, first because it seemed pretty easy and second because I was pretty unsure about what it might look like.  Would it be French Toast or would it be more bread pudding.  Turns out it was much more bread pudding like and pretty good.  I thought the flavor could have been a little stronger, but I'm not sure what else it needed.

I made two changes to the recipe.  First, I left out the almonds because I don't like nuts in baked goods.  Second, I made blackberry sauce because that is what I could find in the supermarket.  Then, I made a salted caramel sauce that I thought would also be good with the blackberry and the combination was delicious.

This would make a good addition to brunch (just remember that it has to sit in the fridge for 8 hours or more before baking).  Check out the recipe and the other bakers here

Friday, November 25, 2011

Turkey Challah for Thanksgiving Shabbat


I saw this turkey challah on a blog and I knew I just had to try it.  It seems like the perfect challah for Shabbat of Thanksgiving, and it is super adorable.  All you do is make a batch of your favorite challah dough (we used this one) and after it rises, cut it into 4 pieces.  Shape one piece into an oval to use for the body.  Cut one piece in half to use for the head and cut the remaining pieces into small balls to use for the feathers.  Roll the small pieces into balls and place them around the head and body to create feathers.  You can use any leftovers to make the turkey's nose and feet.  We used two chocolate chips for the eyes.  This was really fun to make and super easy.  Thanks to Ariella of Sweet Happy Life for the great idea.  She makes lots of really cool shaped challahs that I can't wait to try now that I know how easy it is.

Here's a shot of my little one working on the egg wash (apologies for the photos, they were taken on my phone)...


Happy Thanksgiving and Shabbat Shalom!

Tuesday, November 22, 2011

Adventures with the Ice Cream Maker: Pear Caramel Ice Cream


I know I should be posting something more Thanksgiving-like, such as pumpkin pie (but we all know I hate pumpkin) or something to do with turkey.  However, once thing I have noticed over the last few years of living in California is that Thanksgiving can kind of sneak up on you, since the weather doesn't really change.  That is why I think it is ok to post this ice cream --  it has lots of good fall flavors, but it is appropriate for a place where it is going to be 70 degrees on Thanksgiving day.

This is Pear Caramel Ice Cream from David Lebovitz's The Perfect Scoop.  Once again, David knocks it out of the park with this flavor combination.  You might think it would be too sweet, but the caramel cooks long enough to get a strong, complex and not to sweet flavor.  When you eat this ice cream, you can really taste both the pear and the caramel and they hit you at slightly different times, making the flavor of this ice cream really interesting and the color of the ice cream a gorgeous pale color.  This would be a fine thing to eat on Thanksgiving weekend (although not after turkey if you are kosher -- maybe a midnight snack?).  Happy Thanksgiving to you and your family.

Here is the recipe:
Pear-Caramel Ice Cream

  • 3 medium-sized ripe pears, peeled and cored
  • 3/4 c. + 2 tablespoons sugar
  • 2 cups heavy cream
  • 1/8 teaspooon coarse salt
  • a few drops of fresh lemon juice
  1. Dice the pears into 1/4-inch pieces.
  2. Spread the sugar in a large, heavy saucepan. Cook over medium heat, carefully watching and stirring occasionally with a heatproof spatula until melted. 
  3. When the sugar is a deep amber, stir in the pears. The caramel will seize, that's ok. Continue cooking and stirring occasionally (again with a heat-proof spatula – caramel will burn heck out of you) for ten minutes. The sugar will have dissolved.
  4. Remove from the ehhat and stir in 1/2 cup of the cream, then mix in the rest of the cream, salt, and lemon juice.
  5. Cool to room temp, puree until smooth, press through a strainer.
  6. Chill according to your ice-cream maker manufacturer's instructions. 

Thursday, November 17, 2011

Adventures with the Ice Cream Maker: Have You Milked A Goat Today?

Here's one from the Baking Sisters' dad! Take it away, Dad!


It’s time for another guest blog by the Baking Sisters’ dad. This incredibly delicious recipe is adapted from the signature dessert of Eden Village Camp, the first (and only) Jewish environmental residential camp, located in Putnam Valley, New York. EVC is a wonderful place (you can see for yourself at www.edenvillagecamp.org ) that has what may be the best camp food in America – some of which is grown by the campers themselves!

Enough with the commercial – let’s get right to the recipe:


2-1/4 cups goat’s milk

2/3 cup sugar

scant 1/4 teaspoon salt

3/4 cup blueberries (fresh or frozen)

3/4 cup half & half

3/8 tablespoon vanilla extract


Pour 1-1/2 cups of goat’s milk into a saucepan and bring to a boil. Remove from the heat. Add the sugar and salt, stirring until the mixture is completely dissolved. Chill the mixture in the refrigerator. Puree the blueberries in a blender until almost completely smooth. When the mixture is thoroughly chilled, add the remaining goat’s milk, the half & half, and the blueberry puree. Stir to mix thoroughly. Pour the mixture into the prepared bowl of an ice-cream maker and churn according to the manufacturer’s directions.

As I said, EVC is an environmental camp, so the original recipe calls for milking the goats (I got my goat’s milk in the organic/specialty dairy case at Fairway) and pureeing the blueberries in a bicycle-powered blender (mine is electric). I don’t think either variation affected the taste.

NOTE: I would consider substituting heavy cream for the half & half. And I would add a couple of tablespoons of alcohol (vodka or a fruit-based liqueur) to give the ice cream a smoother consistency.

Tuesday, November 15, 2011

National Bundt Day: Chocolate Chip Marble Cake


Today is National Bundt Day!  Do you know how I know that?  Mary, of the blog The Food Librarian, is obsessed with bundts (in the best way, of course) and, for the third time, has decided to make 30 bundts in 30 days, leading up to today -- National Bundt Day.  Mary's blog is a really great read.  She is smart and funny and she always has lots of fantastic recipes (especially if you are a fan of jello, check this out).  I am always glad to see her pop up in my blog reader.


Mary has encouraged her blog readers to make a bundt to celebrate this momentous day and since all I have to do is make one cake, it seemed the least I could do.  This was the first cake that Mary made in her countdown this year, and it caught my eye right away.  I mean, what could be bad about chocolate and vanilla batter with chocolate chips, swirled together in a big, delicious bundt? 


This recipe is actually based on the marble cake from Buttercake Bakery here in LA.  I've never had their bundt cake (only their cupcakes) but now I am eager to try it.  You can find the recipe here, on Mary's blog.  The recipe calls for dusting with powdered sugar, but I added some ganache as a glaze, since I had some left over from making something else.  I figure, what isn't better with a big spoonful of chocolate over it?  Happy National Bundt Cake!

Sunday, November 13, 2011

Review: New York Chocolate Show


Sarah here! I just got back from the New York Chocolate Show, and MAN am I hyper! Hyper and happy! And probably about 10 pounds heavier than when I walked in. The Chocolate Show is basically a trade expo for chocolate, and the New York one is the only one in America. My mom had found an ad for the chocolate show in the New York Times Magazine and cut it out for me, and since then it haunted my dreams. My friend Rocio was coming into town from D.C. and I suggested that we buy tickets. But $30 was pretty steep for a couple of poors like us. Luckily, her friend contacted her that very day and said she had two free tickets because she was volunteering there! So we wended our merry way to the show, and after waiting on a line that went down the block (a line sweetened by the occasional free sample!), we confronted the beautiful scene. Soooooo much chocolate! Everyone was there: Valhrona, Jacques Torres, Guittard, not to mention a bunch of chocolatiers I had never heard of but was sure glad to make the acquaintance of: Antidote, Divine Chocolate and the Grenada Chocolate Company were some of my favorites. Every kind of chocolate you can imagine was there. Melted chocolate, chocolate made from an 18th-century recipe, salted chocolate caramels, chocolate covered pretzels, chocolate fondue, chocolate cakes, chocolate bars and boxes...


Beautiful, impressive chocolate art...

Link
Some extremely strange chocolate fashion that would have made Lady Gaga envious...


And the most delicious, melt-in-your-mouth chocolate truffles I have ever eaten, courtesy of Traditional French Truffles. I bought a box because they were too delicious to pass up!


A huge shout-out to Rocio's friend Ashley and the amazing Divine Chocolate she was selling. Thanks for a fantastic(ally caloric) afternoon!

Sunday, November 6, 2011

French Lemon Cream Tart


This is a Dorie Greenspan classic that we have made many times and it is hard to believe it has never made it onto this blog.  Dorie calls this the Most Extraordinary French Lemon Cream Tart and she is right -- and not just because there is an extraordinary amount of butter in this tart.  You really don't want to know how much.

On account of the butter, this is not a tart that you might make on a whim for a regular night, but for a special occasion and for someone who loves lemon, this is definitely something I would turn to.  I made this for a lemon-lover in my office for her birthday and it was a big hit.  The filling is not a curd, it is most definitely a cream, like you would find in a chocolate cream pie, but lemon flavored.  It is delicious, soft and silky and much lighter than you might imagine given the ingredients.  Make this for a special lemon occasion.  You can find the recipe here, on Dorie Greenspan's website.

Sunday, October 30, 2011

These Cupcakes Are So Good, It's Scaaaaaaary!


a) I'm thinking of changing the name of this blog to The Baking Sarah. Time to pull your weight, sisters.

b) Tomorrow is Halloween! I had a long-simmering plan to make these delicious cupcakes for Halloween, but with the special limited-edition Halloween Oreos with the orange cream filling. Unfortunately, last year I simply could not find said Oreos in Providence, and so I had to be content with making regular ones. I was very content, though - they were delicious! All the rich, satisfying creaminess of Oreo cheesecake, all in a convenient cupcake-size package. What could be better? Anyway, the plan continued to simmer in my mind, and when I saw the orange Oreos at my local supermarket here in the Greatest City on Earth, I nabbed them! (Never mind that Halloween was more than three weeks away - in my cabinet they sat until they were ready to meet their delicious, delicious fate.) I brought them in to work for a special Halloween edition of Baked Goods Fridays. I have to say, I feared that I was pushing the limits of what people in my office were willing to eat at 9 a.m. with these babies, but they came through, and all the cupcakes were gone by lunchtime!

There's one thing I must warn you about. I probably should have caught on to the fact that a recipe containing two pounds of cream cheese would make a LOT of cupcakes, but I naively believed Martha Stewart when she said it would make 30. Try 60. After I had filled all the Oreo-bottomed cups with batter, I still had half the batter left over, so I made 30 more without any Oreos at the bottom. They were still good, but the crunch of the Oreo (not to mention the special color) combined with the smoothness of the cheesecake is what makes this cupcake a winner. So next time I will halve the recipe. Or buy more Oreos!

You can find the recipe here. Happy Halloween!

Saturday, October 15, 2011

Fallen Souffle for Fall


I don't know if anyone here uses a blog reader (or whatever the kids are calling it these days) to bookmark stuff they want to make. Maybe some of the Baking Sisters' recipes are even on your blog reader, in which case, we're flattered. Anyway, I have no such thing, but I have a rather long-running blog reader in my head. Because it's in my head, a recipe has to really be something special in order to get on this most exclusive of lists. I saw this recipe from Tartelette when she first posted it - in December 2009 - and I haven't been able to get it out of my head since. This is partly thanks to the gorgeous photographs (all the photography on that site is gorgeous), but also because I thought it sounded like such a delicious, elegant recipe. Yet for some reason, I never found the time to make it. Then, one Tuesday evening, my mom came home from the CSA (something that white people do) with a bag full of tiny pears, and I vowed that I would finally take the time to make this recipe.

Honestly, I don't know why I didn't make it before - it really doesn't take much time at all, since you can poach the pears and make the batter basically simultaneously. It was very tasty, although different than I expected. The texture was much more substantial and cake-like than past souffles I've made, but I don't think I overcooked it. Also, as you can see from contrasting my photos with Tartelette's, the pears didn't collapse into the cake but rather baked inside it. Whatever, it didn't matter, it still tasted delicious. And seriously, if you didn't already, go to the original recipe page and look at the photos, they are stunning. No wonder I remembered this recipe for almost two years.

Poached Pear And Almond Fallen Souffle Cakes
From Tartelette

Makes 6

Note: you can core the pears from the bottom to about 1 inch from the top with an apple corer but these are so tiny that I just removed the stem button at the bottom. Everything else in the core baked to very soft texture and the seeds were easy to remove while eating (kind of like tails on baked shrimp).

For the poached pears:
6 mini d'Anjou pears, peeled (or other small pears like Forelles or Seckel)
1/2 cup (100gr) sugar
2-3 cloves
2-3 cardamom pods
1 stick cinnamon
5-6 allspice berries
1-2 star anise
1/2 lemon
4 cups (1 liter) water

For the cakes:
3 tablespoons (40gr) unsalted butter, at room temperature
1/2 cup (100gr) sugar
2 eggs
1 teaspoon pure vanilla extract
3/4 cup (190ml) heavy cream
1 cup ground almonds (blanched or skin on - your preference)
1/4 cup (40gr) sorghum flour (or use 1/4 cup all purpose flour)
1 teaspoon baking powder

Prepare the pears:
Place the pears, spices, lemon and water in tall saucepan and bring to a boil over medium high heat. Lower the heat and let them simmerfor 15-20 minutes or until the pears are just soft (poke with a toothpick to check).
Remove from the water using a slotted spoon and allow to cool on paper towel or baking rack.

Prepare the cakes:
Preheat the oven to 350F and position a rack in the middle.
Slightly butter or spray 6 ramekins and place them on a baking sheet. Set aside.
In the bowl if an electric mixer fitted with the paddle attachment, beat the butter and sugar on medium speed until light and fluffly (about 3 minutes). Add the eggs, one a time and beat well in between each addition. Reduce the speed to low and add the vanilla, heavy cream, almonds, flour and baking powder and beat until incorporated. Fill each ramekins about 1/3 full with the batter and place a poached pear in the center.
Bake for 25-30 minutes.

Tuesday, October 11, 2011

Review: Cupcakes of DC


So two weeks ago I went to Washington, DC for the weekend to visit friends from Brown and Cambridge. It was marvelous to see them, but obviously the most important task any time one is in a new city is to check out the local cupcake scene. My friend Lara said she would take me to the famous Georgetown Cupcake, while my friend Rocio took me to Baked and Wired (so called because there's a coffee shop attached), which is also located in Georgetown. Here are my thoughts:


Baked and Wired ($3.50 each) got immediate points for its funky vibe and decor, which verged on the weird. Not that I think funky vibes and weird decor are automatically an asset; it's just that cupcake shops are usually so twee and precious that it was nice to step into one that didn't look like it was decorated by a six-year-old girl with a fetish for pink stuff. (Mind you, it's not really a cupcake shop but more of a general bakery, so maybe that explains it.) I had a hard time picking a flavor because they had a really wide and inventively-named selection, but eventually I went with Texas Sheet Cake, which is a chocolate-cinnamon cupcake with a chocolate-pecan praline frosting. It was large and very delicious! The cake was moist and more cinnamon-y than I had expected, but the kick of the spice was a good contrast with the maybe-a-touch-too-sweet frosting. (That didn't stop me from splitting half the cupcake with Rocio, who ate the cake while I ate the frosting. Then I had a stomach ache, but the good kind.)


Lara and I ordered from the famous Georgetown Cupcake ($2.75 each) so as to avoid the equally famous line. I highly recommend taking this route. Georgetown Cupcake definitely suffers from the whole pink-fetishist issue - why are so many cupcake shops specifically designed to make any male who walks into them feel gay? Straight guys can like cupcakes! - and the flavors aren't as original as the ones at Baked and Wired. With some trepidation, I ordered a red velvet and a peanut butter fudge (a Sunday special), knowing that neither was my favorite flavor.

I was anxious, with only the anxiety that cupcakes can inspire - what if it turned out to be a case of over-hype, as with Sprinkles in LA? Turns out I needn't have worried. These were some of the best cupcakes I've ever had! Although Baked and Wired was a very strong contender, these were even better; they might have even been better than my beloved Crumbs! For one thing, they were a perfect size; Lara and I cut both of them in half and shared them, and it was just right. The red velvet in particular might just make me into a red velvet convert - it was totally luscious, with the perfect frosting-to-cake ratio. And just look at this picture of the peanut butter fudge and tell me that it doesn't make you hungry.


So all in all, a very successful trip. I'll have to go back soon and try other cupcake places, like Hello Cupcake and the Red Velvet Cupcakery, which we passed on our way home (and where I can test my new opinion of red velvet!)

Sunday, October 9, 2011

BAKED Sunday Mornings: Oatmeal Chocolate Chip Cake


This week's choice for Baked Sunday Mornings, Oatmeal Chocolate Chip Cake with Cream Cheese Frosting, used one of the strangest methods I have ever encountered.  First, you essentially make oatmeal with boiling water and butter and then you fold it into a cake batter.  It may be strange, but it works because this is definitely one of my favorite recipes that we have made so far.  The cake had a nice chewy texture, the chocolate chips added a nice layer of flavor and the cream cheese frosting was divine.  It might be a little intense for a regular morning breakfast, but it makes a nice morning treat or a yummy dessert.


Today is the day after Yom Kippur, a fast day in the Jewish calendar.  It is a really busy time of year for me and not a great time to be baking but this was really easy to put together and made a good break fast last night.  I will be making this again.

Saturday, September 24, 2011

BAKED Sunday Mornings: Honey Corn Muffins


Sometimes, when Baked Sunday Mornings comes around, I get scared of how much work the recipe is going to be.  However, when I hoped up the book to look at this recipe, I breathed a sigh of relief.  2 bowls, one muffin tin, no mixer and these muffins were done in under 30 minutes.  And they were quite yummy to boot, with a good corn flavor and a little something extra from the honey.  They tasted like the best version of a corn muffin -- not too sweet with a good texture.  I ate one plain right out of the oven, and then the next day with butter and honey and they were both delicious.  I've been on something of a baking pause because this is my insane time of year at work, so it was nice to find something easy and yummy to make.

Tuesday, September 20, 2011

Carrot Cake: Not As Healthy As It Sounds


Last week, I set myself a challenge. We were at my grandmother’s post-unveiling lunch and my cousin Danielle, who is petite and blond and very pretty, was talking about how she had decided to give up bread for the week after eating seven slices of pizza and realizing how much bread was in her diet. She has the world’s most enviable metabolism, and can out-eat pretty much anyone I know while still remaining super-thin. Some people have all the luck. Anyway, this is relevant because she inspired me to try and give up sweets for a week. I realized that I eat three or four desserts a day – dessert encompassing candy, baked goods, ice cream and soda – and that it probably wasn’t that healthy, and that I was probably addicted. So give up sweets I did. I have to say, it was extremely difficult. Before my mom even knew what I was doing, she asked me why I was acting so ornery. My body really missed the regular injection of sugar. And since I was going to be free of my bond on Thursday night, I had this great plan for all the crap I was going to eat, especially the delicious ice cream my dad and I had made the week prior. (On Wednesday night I went to check on it, and discovered that over my sweet-free week, my dad had eaten it all! The outrage! And I didn’t even get to photograph it, so I’m afraid it won’t be making an appearance on this blog any time soon, although it was extremely tasty.)

Anyway, Thursday night rolled around, and what did I discover? I didn’t even really crave sweets any more. Sure, if you put them in front of me, I would eat and enjoy them, but I wasn’t as excited as I imagined to be re-introducing them to my digestive system. All I ended up eating that night, sweets-wise, was a bit of carrot cake batter, and I was satisfied.

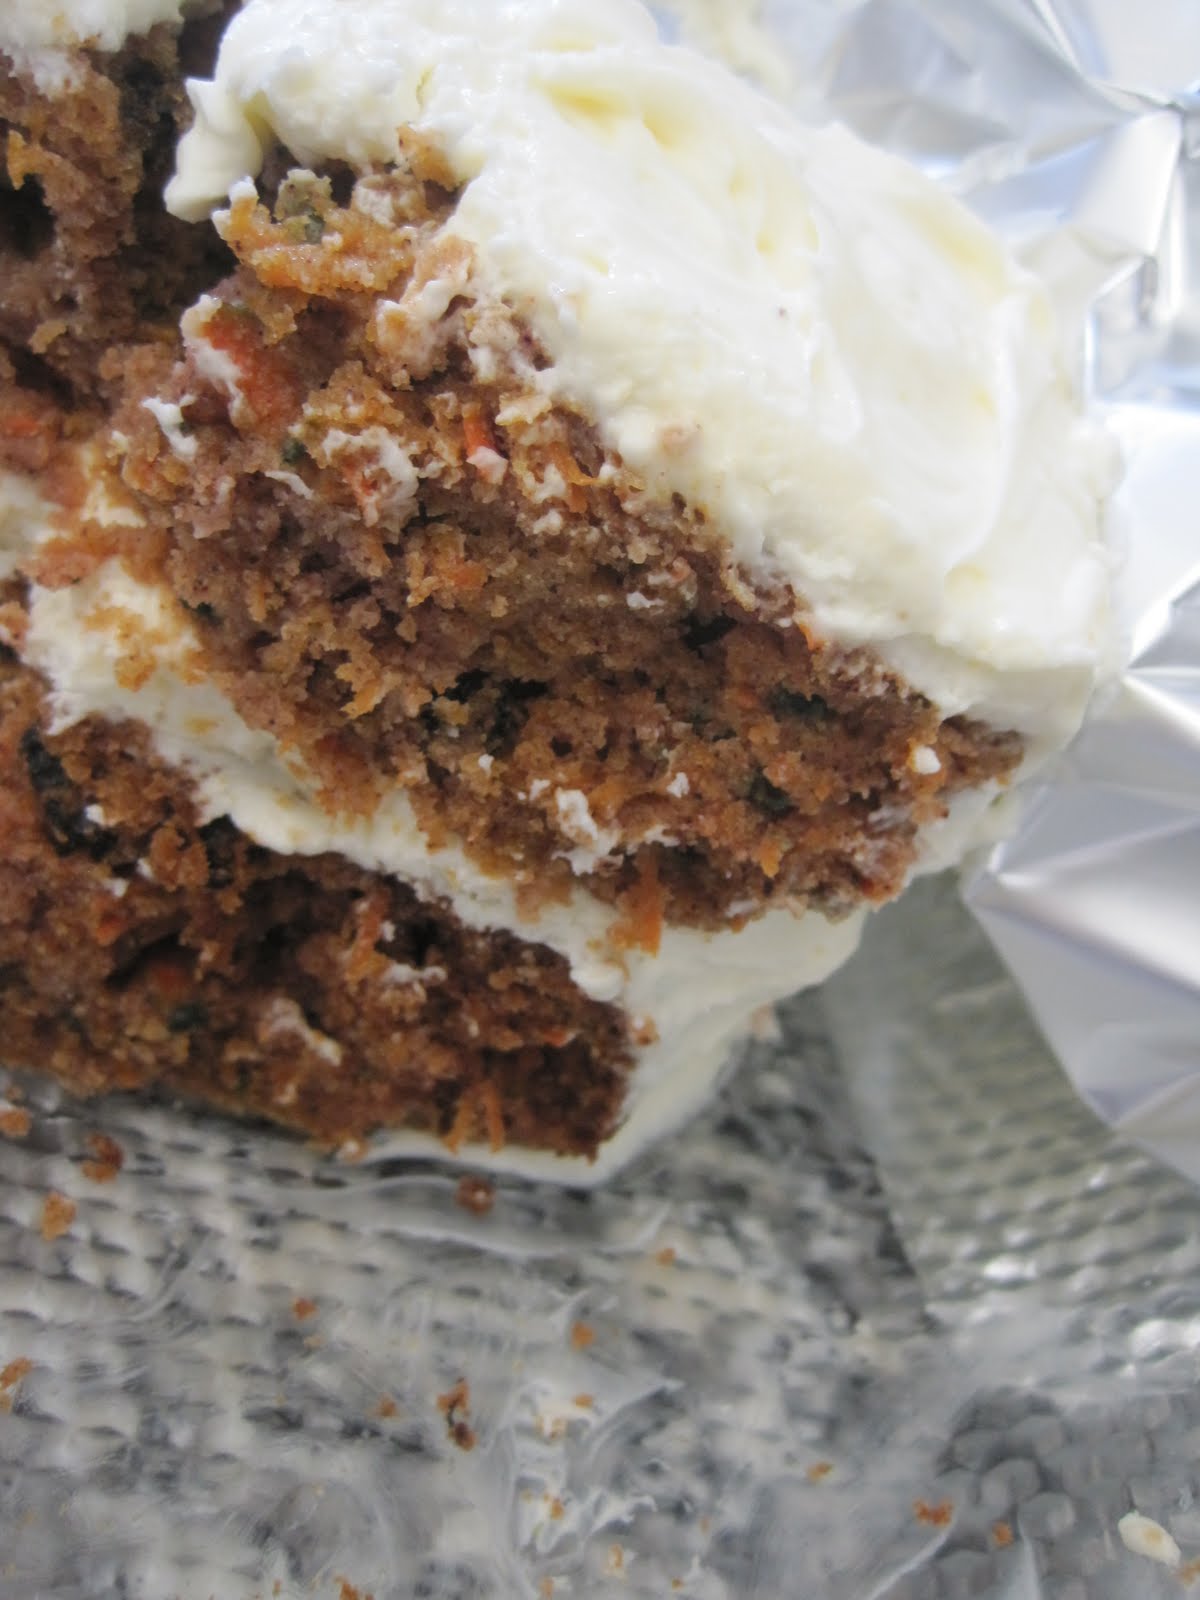
Ah, carrot cake, ye most deceptive of cakes. Your name makes you sound all healthy, yet you are one of the least healthy cakes out there. My friend Allison and her kind mother gave me a new cookbook for graduation, and I wanted to try it out. Luckily, my dad’s birthday was on Friday, so I had the perfect excuse! I happily grated carrots, before being informed that using the food processor attachment would probably be a lot faster. I blithely dumped mounds of shredded carrots, toasted nuts, flour and sugar in the mixer. I gaily cracked eight eggs. As the ingredients mounted, I thought, “Wow, this sure seems like a lot of batter.” But the recipe said it made a 12 x 7 inch cake, so…

Wrong. Dead wrong. It said it made a 12 x 17 inch cake. My kitchen not being a professional bakery, I do not own such a ridiculous pan. So I split it into two pans that had roughly the same combined surface area as a 12 x 17. Grrr, I hate it when I have to do math in order to make cakes. Anyway, it took longer for them to bake than the recipe said because I think they were thicker, but whatevs. I pulled them out of the oven and decided to frost one and bring it into work the next day, and use the other for my father’s birthday cake.

WRONG AGAIN. Apparently, the Amy’s Bread cream cheese frosting is the most high-maintenance cream cheese frosting in the world, as you have to make poured fondant and then refrigerate it for 24 hours before incorporating it into the frosting. Once again, if I were good at reading recipes, this sort of thing wouldn’t happen. So I had to make some quick brownie buttons to bring into the office instead, stick my fondant in the fridge and hope that I would have enough time to whip up the frosting before Shabbat dinner on Friday. Which I did. And it was really good frosting, although there was a LOT of it. Which was appropriate, because there was a LOT of cake. I stacked the cakes on top of each other, trimming one so that they’d be the same size, but even after the trimming it was still the biggest cake in history. It could feed all of North Korea. We had eight dinner guests but we still only ate about a quarter of the cake. I brought another quarter of the cake to my friends’ house, where three boys and three girls were unable to eat even half of it. This cake was nuts.

And how did it taste? Very good! It was moist and dense, but also springy, and it keeps pretty well in the fridge, which is lucky because we’re going to be eating it until my dad’s next birthday. He says that the fondant is probably to stabilize the cream cheese frosting so that it doesn’t melt, and maybe he’s right – I’ve never been much good at that kind of chemistry thing. All I can say is it’s quite a pain, although if you know in advance that you’re going to make it, you can keep the fondant in the freezer for some time and take it out when needed. Next time around, I am halving this recipe, fo shiz.

Saturday, September 10, 2011

Cream-Colored Ponies and Moist Strawberry Streusel


Hey there, long time no Baking Sisters. Wassup.

When you are a prolific baker, it’s good to have what I like to call “back-pocket recipes” on hand. These are foolproof recipes with simple ingredients that don’t take long to make but always impress. Some of my favorite back-pocket recipes are tarte noire, Emily’s apple pie, and chocolate (fake) soufflés. But when I am called upon to make a dessert that is both parve and non-chocolate, this cake from Kosher By Design: Short on Time is always the one that I go to. The problem with most parve cakes is that you can really taste the lack of butter. Not having frosting goes a long way towards helping this, but usually the cake itself is still dry and crumbly. Not so this cake. It’s light yet satisfying, it stays moist and delicious for days, and it’s incredibly simple to make. Try this out, and you’ll want to keep the recipe in your back pocket, too.

I am aware that Rachel had already blogged about this. I would like to state that I have made this cake many, many times and I've never had the problems she had - thus proving categorically that I am a better person than Rachel. Just kidding. But seriously, this cake is fool-proof. Thus proving that Rachel is a fool. Just kidding again. Before I get myself into more trouble, here's the recipe.

Sunday, August 28, 2011

BAKED Sunday Mornings: Coffee Ice Cream


Amazing!  A Baked: Explorations recipe that didn't involve every dish in the house.  This week's pick was coffee ice cream.  Now, I am not a coffee person, but I love coffee ice cream.  I have made David Lebovitz's coffee ice cream before and it is good ice cream, but the bitter coffee flavor is a little bit too strong for me.  Maybe it is the beans I am using?  I was hoping that this version might have a different coffee flavor, since it uses espresso powder and Kahlua to give the coffee flavor.  I think something might have gone wrong when I added the salt (like maybe I added 2 teaspoons by accident or something), because the base was really salty.  It actually reminded me more of salted caramel ice cream than coffee ice cream. It was actually really interesting and I enjoyed eating it, but I want to make this again to see what it really tastes like.  Head over to the Baked Sunday Mornings blog to see how everyone else did.


I put this ice cream on top of a chocolate cake with coffee glaze (that I will blog about later) and the combination was great.  The cake was able to cut some of the salt flavor.

Tuesday, August 23, 2011

Adventures with the Ice Cream Maker: Our Favorite Late-Summer Ice Cream


We’re coming to the end of summer, and it’s very sad. The days are getting shorter, the nights are getting cooler, and soon all the delicious summer produce that floods the farmers’ markets between June and September will be gone. But fear not, there’s still some time to make this tastiest of ice creams: peach sour cream. We’re serious; if you only make one more ice cream this season, make it this one. It's so easy - it doesn't involve egg yolks or custards or anything of the sort, you pretty much just cut, stew and blend. Daddy and I both agree that it’s the best ice cream we’ve ever had. How good is it? I dipped in a spoon to take a taste while it was churning, and after I tried it, I literally exclaimed aloud, “Oh my God, this is good,” even though there was no one else around. It’s so good that I practically had to drag Daddy to Grom, which has the best gelato in the city (in our opinion), because he just wanted to stay home and eat the peach sour cream ice cream. You shouldn’t even be reading this. Go, make a batch right now. That’s what Daddy and I are doing tonight.

Peach Ice Cream from The Perfect Scoop

Yield: 1 quart

Ingredients:

  • 1 ½ pounds [600 grams] ripe peaches [about four large peaches]
  • ½ cup water
  • a quarter cups sugar
  • ½ cup sour cream
  • 1 cup heavy cream
  • ¼ teaspoon vanilla extract
  • A few drops freshly squeezed lemon juice

Preparation:

Peel the peaches, slice them in half, and remove the pits. Cut the peaches into chunks and cook them with water in a nonreactive saucepan over medium heat, covered, stirring once or twice, until soft and cooked through, about 10 minutes.

Remove from heat, stir in the sugar, then cool to room temperature.

Purée the cooked peaches and any liquid in a blender or food processor with the sour cream, heavy cream, vanilla, and lemon juice until almost smooth but slightly chunky.

Chill the mixture thoroughly in the refrigerator and freeze in your ice cream maker according to manufacturer’s instructions.


Tuesday, August 16, 2011

Salty Brownies for Sweet Katy


Two weeks ago today was my first day of work. I love it so far but, as with any new job, there is a lot to learn! Luckily, I am helped along mightily by Katy, another assistant in the office. She has been training me, and has been so surpassingly kind and helpful and patient in answering even my dumbest questions. (Sample: Sarah: I can't find the Zingales contract, where is it? Katy: Have you checked the contracts folder? Sarah: Oh, thanks.) I wanted to give her a token of my gratitude, and the way I give tokens of gratitude is by baking. Luckily, I had wanted to make the sweet and salty brownies from Baked for a while, ever since finally caving and buying a box of fleur de sel, and this gave me a fine excuse.

As with all Baked creations, this was very buttery, very yummy and very complicated. I was a little disappointed with the caramel flavor, or lack thereof. Maybe I was too cautious because I didn't want it to touch the sides of the pan and so I didn't use enough of it, but I barely tasted it in the finished product. This was probably because of the overwhelming chocolateyness, although next time I will take the suggestion to drizzle the leftover caramel on top. When you eat these brownies, make sure you have a glass of water or milk on hand, because they are EXTREMELY rich. I baked them for 40 minutes instead of 30 and they were still slightly undercooked, but that's how I like 'em. The fleur de sel was definitely worth the purchase, and it really added a special something to the brownies. Between these brownies and showing every how to make PDFs using OpenOffice, I was totally the office hero on Friday.

You can find the recipe here.

Sunday, August 14, 2011

Baked Sunday Mornings: Grasshopper Bars


Just noticed something...this is our 200th post!  Wow.  Now, back to regularly scheduled programming.


Another Sunday, another Baked recipe that uses every bowl and utensil in the kitchen.  These were among the recipes that I was most excited to make because I love the combination of chocolate and mint.  However, I had a couple of significant issues with this recipe.  First, Kosher Creme de Menthe does not seem to exist.  Anyone out there know anything about that.  I figured I would just leave it out.  The filling tasted fine, but it did not whip up light and fluffy (as you can see in the pictures).  I don't know if the flour/sugar mixture was too hot when I added the butter, although it felt cool to the touch or what, but no matter how long I whipped it, it would not whip up and I didn't have the patience to try again this morning.  Then, when I put the glaze on, it seemed to melt the mint filling, so it got swirled into some of the glaze instead of creating a nice shiny top.


Despite all that, I really enjoyed the flavor of these.  I hope to try them again and try to get the mint filling right because I think it would have provided a nice balance of texture.  As they were, I thought they were a bit to heavy and fudgey, but overall yummy.


You can find the recipe and what other people baked at Baked Sunday Mornings.

Sunday, August 7, 2011

Adventures with the Ice Cream Maker: Keeping It in the Family


Note: Today's double-header is brought to you by Sarah and the Baking Sisters' dad, Irv.

If you're like me, then you believe that there are certain things that define summer. Beautiful sunset walks along the Hudson in Riverside Park...

Sunflowers...

And these small, ripe, intensely flavorful strawberries that start to pop up in farmers' markets around June.
For me, this summer has also brought some exciting news - I finally got a job! I started last week and I love it so far. Conveniently, the night before I started my job happened to be Erev Rosh Chodesh Av. For those of you scratching your heads, that means "the evening of the first day of the month of Av" (Av being the fifth month on the Jewish calendar, and Jewish days starting at sunset.) Despite my happy employment news, Av is considered the saddest month on the Jewish calendar because both of the ancient Temples in Jerusalem were destroyed on the Ninth of Av, plus a lot of other sodding things supposedly happened on that date that I won't get into here. One of the ways that we show our sadness is by not eating meat or doing various other happy things for the nine days leading up to the Ninth of Av. So between our impending meat deprivation and my entry into the world of wage labor, the situation obviously called for some meat. And when the situation obviously calls for some meat, there is an equally obvious call for parve dessert.

My contribution came in the form of brownie bites from Kosher by Design: Short on Time. They are a snap to put together, they are moist and fudgy and last for ages, and when I gave one to my friend she didn't even realize they were parve! You obviously don't have to cut them just the way the recipe says but I agree with Susie Fishbein that it's waaaay fun to eat the edges around the brownie circles. I didn't do all that business with flipping the brownies out of the pan; I found that if you just use a biscuit cutter, they come out pretty easily. I also didn't roll them into balls because in my experience that's always made a huge crumbly mess, but if you want to try it best of luck to you.

Brownie Bites
From Kosher by Design: Short on Time (page 240)

1/2 cup (1 stick) unsalted margarine, melted and placed in refrigerator to cool for 10 minutes
3/4 cup good-quality Dutch process cocoa powder
1/4 cup vegetable or canola oil
2 cups sugar
1 cup all-purpose flour
3 large eggs
1 teaspoon pure vanilla extract

Coating: confectioner's sugar, cocoa powder, chopped nuts, edible glitter, colored sanding sugars

Preheat the oven to 325 F. Line a 7- by 11-inch brownie pan with parchment paper and coat with non-stick cooking spray.
In the bowl of an electric stand mixer, combine the melted margarine, cocoa powder, oil, sugar, flour, eggs and vanilla. Beat to combine.
Spread the mixture into the prepared pan.
Bake for 35-40 minutes. Remove the pan from the oven and place into the refrigerator for 20 minutes or until cool enough to handle.
When the brownies are cool, run a knife around the edge of the pan. Flip the brownie out onto a piece of parchment paper on a hard word surface in one whole piece. Using a 1 1/2 inch diameter round cookie cutter, cut circles from the center of the brownie, leaving the harder crust. Roll the circles between the palms of your hands to form into balls, and roll into coating of your choice.
Store in airtight container.


Over to you, Dad!

The Baking Sisters’ father is glad to be back for a guest blog. When Sarah graduated from college and returned home with her ice cream maker, I decided to experiment. (I guess it’s in my blood, since my father owned a drive-in ice cream store when I was growing up, and I worked there every summer when I was a teenager.) This recipe was one of my best finds.

Everyone knows that there are two kinds of strawberries: those made for travelling and those made for eating. The travelling kind – the ones you get in the supermarket year-round that are bred to make it across the country in one piece – look beautiful but are hard and white on the inside and have no taste. The eating kind are small, sometimes misshapen, but red all the way through and almost oozing sweet juice. So while summer lasts, get to a greenmarket or farm stand and buy some locally-grown berries. Then turn them into this amazing strawberry sorbet with flavor even more intense than the berries themselves. You can make it with “travelling” berries, but why bother?

This recipe is adapted from The Perfect Scoop by David Lebovitz. It makes about 4 cups.

1-1/3 lbs. (yes, pounds) fresh strawberries, rinsed and hulled

1 cup sugar

1-1/3 tsp. kirsch (optional, but it adds a nice punch)

1-1/3 tsp. freshly-squeezed lemon juice

Pinch of salt

Slice the strawberries and toss them in a medium bowl with the sugar and kirsch, stirring until the sugar begins to dissolve. Cover and let stand for one hour, stirring every so often.

Puree the strawberries and their liquid with the lemon juice and salt in a blender or food processor until smooth (I prefer the blender). There is no need to strain out the seeds.

Chill the mixture thoroughly, then freeze it in your ice cream maker according to the manufacturer’s instructions.

Enjoy, and plan to make more soon, since this batch won’t last.


Related Posts with Thumbnails