Monday, December 28, 2009

Buy Me Some Peanuts and Crackerjacks...


So in our family, despite our Jewish ways, we have certain Christmas traditions. One is that we always go to the Big Apple Circus on Christmas Day; another is that we always go right home and build a fire in the fireplace right after. Usually, we eat cheese, toast marshmallows, and beg our parents to please, please, please refrain from singing along with the Alan Sherman album. This year, however, scheduling was a little more complicated since Christmas falls on a Friday, and Shabbat starts very early. Therefore, a little creative wrangling was necessary, and we needed to find something to replace the traditional s'mores dessert.

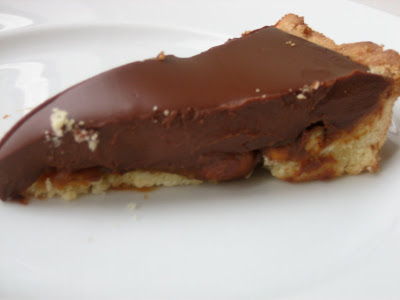
In order to keep in the festive holiday spirit and celebrate our trip to the circus and our usual chocolate overload, my sisters and I-- reunited once again-- decided to make Dorie Greenspan's Chocolate Caramel Crunch Tart. The tart includes three components: the sweet tart crust, a layer of honey roasted peanuts coated in caramel, and a thick layer of chocolate ganache.

We started by making the tart crust, so it could bake and cool while we prepared the other components. I confess that making the caramel made me a little bit nervous-- both the idea of sputtering sugar and the fear of having to wash the dishes afterward struck fear in my heart. However, as I watched the sugar bubble and thicken, and then watched it turn into that rich caramel color as we added other ingredients, I felt that even the time that would doubtless be spent scrubbing the spoon later would be worth it.

The ganache didn't quite set up the way we expected it to. The color was a little lighter than expected, and it didn't get as thick as we thought it should. There was also much conversation about the possibility of blow drying the ganache, as Dorie had taught Sarah, but ultimately we decided to let it be (mostly because there is no blow dryer in this house, apparently.) However, we left in the fridge for longer than the recommended half hour, and it turned out perfectly.

This dessert is definitely not meant to be a light snack. It is intensely rich, and best eaten in small slices. But I promise that you will enjoy every bite.

P.S. This is our 50th post! Wow!

Chocolate Caramel Crunch Tart:

Sweet Tart Dough
Makes enough for one 9-inch tart crust

1 1/2 cups all-purpose flour
1/2 cup confectioner’s sugar
1/4 teaspoon salt
1 stick plus 1 tablespoon very cold (or frozen) unsalted butter, cut into small pieces
1 large egg yolk

Pulse the flour, sugar and salt together in the bowl of a food processor. Scatter the pieces of butter over the dry ingredients and pulse until the butter is coarsely cut in. (You’re looking for some pieces the size of oatmeal flakes and some the size of peas.) Stir the yolk, just to break it up, and add it a little at a time, pulsing after each addition. When the egg is in, process in long pulses–about 10 seconds each–until the dough, which will look granular soon after the egg is added, forms clumps and curds. Just before you reach this stage, the sound of the machine working the dough will change–heads up. Turn the dough out onto a work surface and, very lightly and sparingly, knead the dough just to incorporate any dry ingredients that might have escaped mixing. Chill the dough, wrapped in plastic, for about 2 hours before rolling.

To roll the dough: Butter a 9-inch fluted tart pan with a removable bottom. Roll out chilled dough on floured sheet of parchment paper to 12-inch round, lifting and turning dough occasionally to free from paper. (Alternately, you can roll this out between two pieces of plastic, though flour the dough a bit anyway.) Using paper as aid, turn dough into 9-inch-diameter tart pan with removable bottom; peel off paper. Seal any cracks in dough. Trim overhang to 1/2 inch. Fold overhang in, making double-thick sides. Pierce crust all over with fork.

Alternately, you can press the dough in as soon as it is processed: Press it evenly across the bottom and up the sides of the tart shell. You want to press hard enough that the pieces cling to one another, but not so hard that it loses its crumbly texture.

Freeze the crust for at least 30 minutes, preferably longer, before baking.

To fully or partially bake the crust: Center a rack in the oven and preheat the oven to 375 degrees F. Butter the shiny side of a piece of aluminum foil (or use nonstick foil) and fit the foil, buttered side down, tightly against the crust. And here is the very best part: Since you froze the crust, you can bake it without weights. Put the tart pan on a baking sheet and bake the crust for 20 to 25 minutes.

Carefully remove the foil. If the crust has puffed, press it down gently with the back of a spoon. Bake the crust about 10 minutes longer to fully bake it, or until it is firm and golden brown, brown being the important word: a pale crust doesn’t have a lot of flavor. (To partially bake it, only an additional 5 minutes is needed.) Transfer the pan to a rack and cool the crust to room temperature, and proceed with the rest of your recipe.

Caramel
Scant 1/2 cup heavy cream
1/2 cup sugar, sifted
1 tablespoon corn syrup
2 tablespoons salted butter, cut into 4 pieces, room temperature

Ganache
8 oz bittersweet chocolate, finely chopped
1 cup + 2 tablespoons heavy cream
4 tablespoons unsalted butter, cut into 4 pieces, room temperature

3/4 cup honey-roasted peanuts, coarsely chopped
1 9-inch tart shell made with Dorie's Sweet Tart Dough (p.444), fully baked and cooled

Getting Ready: Because you have to work quickly once the sugar caramelizes, you should have all the ingredients for the caramel measured out and at hand before you start. Also have a medium heatproof bowl at hand to hold the hot caramel.

To Make the Caramel: Bring the heavy cream to a boil.

Meanwhile, put a medium skillet, preferably nonstick, over medium heat and sprinkle in about 3 tablespoons of the sugar. When it melts, stir it with a wooden spatula or fork and sprinkle over another 3 tablespoons. When that sugar is melted, add the remaining 2 tablespoons sugar - the sugar in the pan may already have started to color, and that's fine. Stir in the corn syrup and boil the syrup until it reaches a deep caramel color - it will probably begin to smoke, and that's normal.

Stand back and stir in the butter. The caramel will bubble furiously and may spatter, so make sure you're away from the action. When the butter is in, add the warm cream - the caramel will bubble furiously again. Lower the temperature just a tad and let the caramel boil for just 2 minutes (226F on candy thermometer). Pour the seething caramel into the heatproof bowl and set aside while you make the ganache.

To Make the Ganache: Put the chopped chocolate in a heatproof bowl and have a whisk or a rubber spatula at hand.

Bring the cream to a boil. Then pour half of it over the chocolate and let sit for 30 seconds. Working with the whisk/spatula, very gently stir the chocolate and cream together in small circles. Pour in the remainder of the cream and blend it into the chocolate. When the ganache is smooth and shiny, stir in the butter piece by piece. Don't stir any more than you must to blend the ingredients - the less you work it, the darker, smoother and shinier it will be.

Cover the ganache with plastic wrap, pressing it against the surface to create an airtight seal. Set aside at room temperature for the moment.

To Assemble the Tart: Stir the peanuts into the caramel. If the caramel has cooled and is too thick to spread easily, gently warm in the microwave in 3-second spurts. Spread the caramel over the bottom of the tart shell; you'll have a thin layer. Refrigerate the tart for 15 minutes to set the caramel.

Check the ganache. If it has thickened, warm it in 3-second spurts. Rap the bowl to break any surface bubbles, pour the ganache over the caramel and jiggle the pan to even it.

Refrigerate for 30 minutes - no longer - then keep it at room temperature until serving time.


Saturday, December 26, 2009

Bye, Bye, Miss American Pie


Before we begin this post, I would like to welcome our sister Rachel to our blog, and put forth a potential new name for our blog (courtesy of my friend Ben): "Baking with the Matriarchs."

Okay, on to business. Big news (that's also old news, but I don't think I've ever mentioned it on the blog) - I, Sarah, will spending the next semester in Cambridge, England. This is very exciting. It is also faintly worrisome, since on top of all the other things I have to be anxious about, I don't know if I'll have access to an oven! Oh no! According to the lady in charge of logistics, "Your accommodation will have a small, shared kitchen or
'gyp' room in which you can prepare small meals (there are cooking restrictions)." What this means is an enigma, chock-full of intrigue and British slang such as "'gyp' room." Mysterious!

In any case,
as any Harry Potter reader knows, British people eat weird food like pumpkin pasties, black pudding and something called "spotted dick." Before I depart to this strange land, I was thinking about some uniquely American dishes, and nothing is more American than apple pie. Plus, my suitemates and I make pie at least once a year (usually on Pi Day, which I don't think they have in Britain since they write the date as 14.3 instead of 3.14), so why should this year be an exception? We always make the same pie. The recipe comes from my suitemate/love of my life, Emily Li, and it is the simplest, most fool-proof and yet most delicious pie in the universe - probably because it's filled with looooove. One time that we made it, we did not have a single correct ingredient, and yet it was still the best pie we had ever made...UNTIL NOW.

We do some variations, especially for the filling. For instance, sometimes we use pears; we usually throw in whatever spices we have around (in this case, cinnamon, nutmeg and allspice) plus brown sugar - they balance each other out very nicely. We mostly make a lattice top covered in cinnamon sugar, except last year for Pi Day when we made 3.14 slits in it and used chocolate chips to make a "Pi" sign. Basically, we are dorks.

But back to this pie. I am quite certain that it's the best one we ever made. Even though none of us were very hungry, Emily, Devon and I ended up eating about a third of the pie by ourselves. Both the crust and the filling are totally rich and satisfying. It's incredible that something so simple could come out tasting so good. I have no idea where it came from, but it is surely a keeper

Emily's Apple Pie

For the pie:
1.5 cups of flour
2 sticks of cold butter
6 tablespoons of warm water

For the filling:
5 apples (we used Macintosh - you can also include pears)
1/3 cups flour
Brown sugar, to taste
Whatever spices you feel like using (we used cinnamon, allspice and nutmeg)
1 tsp. of lemon juice
Cinnamon sugar, for dusting

Preheat the oven to 400 degrees. Cut the butter into the flour using your fingers until some are the size of crumbs and some are the size of peas. Add the water and mix with a fork until it comes together. Divide the dough in half - there's no need to chill it. Take one half and press into the pie pan.

Peel, core and slice the apples. Toss the pieces in the flour, sugar and spices and dump them into the pie. Use the other half of the dough to create a lattice, then sprinkle with cinnamon sugar. Bake until the apples are soft and the pie is golden-brown, about 35-40 minutes.

Wednesday, December 23, 2009

Adventures with the Ice Cream Maker: Orange Popsicle Ice Cream


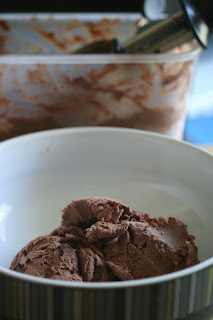
So, I made this ice cream a long time ago (it is actually getting somewhat chilly in Texas -- around 60 during the day, ha ha) but only got around to posting this now.  This ice cream is from one of my favorite books, David Lebovitz's Perfect Scoop.  I have made many different flavors from this book, and they have all been great, so I feel sad saying that this was not a hit with me.  I love, love, love orange and cream popsicles, so I was excited about this flavor and quite sad when it didn't turn out like I wanted it to.

So, why am I posting about it?  Two reasons.  One, my husband enjoyed it, so I think it is a matter of taste.  Two, I think it was the quality of the ingredients that made this not a big hit.  You have to zest three oranges and, once I tasted the ice cream, I think the zest was bitter and so it infected the whole ice cream.  I don't know how you figure out if your zest is bitter or not.  The orange smelled sweet, but the flavor of the ice cream was somewhat off for me.  David suggests pairing this ice cream with white chocolate (and making a kind of tartufo out of it) and I think that would have helped here, as it would have had more sweetness to balance the bitterness.  It also may have given it more of the "orange and cream" flavor that I was looking for.

Anyway, I encourage those of you who can find really good oranges to try this ice cream and tell me how it is.  I'm thinking it was just me.

Here is the recipe:
Orange Popsicle Ice Cream

2/3 cup sugar
Grated zest of 3 oranges
1¼ cups freshly squeezed orange juice (from 3-5 oranges)
1 cup sour cream
½ cup half-and-half
2 tsp. Grand Marnier
In a blender, pulverize the sugar and orange zest until the zest is very fine.  Add the orange juice, sour cream, half-and-half, and Grand Marnier, and blend until the sugar is completely dissolved.  Chill the mixture thoroughly in the refrigerator, then freeze it in your ice cream maker according to the manufacturer’s instructions.

Monday, December 21, 2009

Chocolate Chip Cookies for Kids with No Teeth


Important Blog Note:
We have added a new baking sister...our middle sister Rachel!  You will be hearing from her soon.  In the meantime, show us some love by commenting or following our blog.

My son goes to a pre-school/daycare near where we live and at this time of year, all the classrooms have Hanukkah party.  He is the oldest in the 12-18 month room, so he is one of the few kids in the class who can eat everything (some of the younger kids don't have many teeth yet).  Over the last few months, room has kind of turned into the infant room, with a couple of kids who are much younger than 12 months and who don't eat food at all, so their classroom was not really planning to have a Hanukkah party.  One of the other moms and I decided we should do something anyway.  She offered to make sandwiches in the shape of Jewish stars (even though her daughter is 7 months and doesn't eat sandwiches) and I agreed to make cookies.

I thought that all kids probably like chocolate chip cookies (at least the ones who have teeth) and so that is what I decided to make.  I turned to Dorie (because where else do the baking sisters turn?) and decided to make her chocolate chip cookies, which she said are the best.  They came together really easily (side note -- I do not understand people who use cookie mix from a box.  It does not take any less time and the from scratch cookies taste sooo much better.  Cake mix, I understand.  You might worry it won't rise or something, but cookies are pretty fool proof -- end of rant).  Anyway, I decided to make them small because the kids are small and, although I was intending to make softer cookies, following Dorie's baking time overcooked them, probably because they were small.

I halved the recipe (which is really easy to do), although I think I forgot to halve the salt because I could really taste it.  It was not a bad thing.  It added to the depth of flavor of the cookies, but I don't know if I did something wrong or not.  For those of you who have made these before, is the salt really prominent or did I forget to halve it?

Anyway, still got a lot of cookies out of it, so I froze some of the dough.  The cookies were delicious.  Really, really flavorful, with just the right ratio of chocolate to cookie.  Dorie suggests chopping the chocolate, but I used regular chips and it was totally fine.

Here is the recipe:
2 cups all-purpose flour
1 tsp salt
3/4 tsp baking soda
2 sticks (8 ounces) unsalted butter, at room temperature
1 cup sugar
2/3 cup (packed) light brown sugar
2 tsp pure vanilla extract
2 large eggs
12 ouncs bittersweet chocolate, chopped into chips, or 2 cups store-bought chocolate chips or chunks
1 cup finely chopped walnuts or pecans

Center a rack in the oven and preheat the oven to 375 degrees F. Line two baking sheets with parchmentor silicone mats.
Whisk together the flour, salt, and baking soda.
Working with a stand mixer, preferably fitted with the paddle attachment, or with a hand mixer in a large bowl, beat the butter at medium speed for about 1 minute, until smooth. Add the sugars and beat for another 2 minutes or so, until well-blended. Beat in the vanilla. Add the eggs one at a time, beating for 1 minute after each egg goes in. Reduce the mixer speed to low and add the dry ingredients in 3 portions, mixing only until each addition is incorporated. On low speed, or by hand with a ruber spatula, mix in the chocolate and nuts. (The dough can be covered andd refrigerated for up to 3 days, or frozen. If you'd like, rounded tablespoonfuls of dough, ready for baking. Freeze the mounds on a lined baking sheet, then bag them when they're solid. There's no need to defrost the ough before baking-just add another minute or two to the baking time.)

Spoon the dough by slightly rounded tablespoonfuls onto the baking sheets, leaving about 2 inches between spoonfuls.

Bake the cookies- one sheet at a time and rotating the sheet at the midway point- for 10-12 minutes, or until they are brown at the edges and golden in the center; they may still be a little soft in the middle, and that's just fine. Pull the sheet from the oven and allow the cookies to rest for 1 minute, then carefully, using a wide metal spatula, transfer them to racks to cool to room temperature.

Repeat with the remainder of the dough, cooling the baking sheets between batches.

Saturday, December 19, 2009

A Sweet Suite Christmas


Oh the weather outside is frightful. I'm not being cute. There's an epic blizzard right now, so I am staying inside with a mug of cocoa, the movie "Elf" and the warm, warm memories of my wonderful semester at Brown. I've just left and am not going back until September. Sad. But we had a wonderful Christmas party last week, and I will keep the memories for a long time!

In truth, I love Christmas. Not so much the birth of our savior part, but the secular aspects. I love the lights, I love the music and I love the cookies! It's someone's ethnic flavor, but it's sure not ours. So I provided all the food. If you look at the picture above, you will see (from top left):

1) Cookies in the shape of Christmas trees, reindeer and gingerbread men
2) Peppermint bark
3) Mint truffle cake
4) Molasses cookies (already blogged about here)
5) Hanukkah gelt
6) Sables (already blogged about here)
Not seen: Hot apple cider (half "naughty," half "nice)

As you can probably tell from the picture, I didn't get any good photos of the food at this event, but that doesn't mean the food wasn't delicious! I would especially like to write about the cake, since it's one of my all-time favorite recipes. I made it last year for my friend Wendy's birthday, and I think it was the best cake I made all year. The recipe is from Epicurious by way of Dozen Flours, and even people who don't love mint love this cake.

The cake itself is extremely light, which I think makes it appropriate for the peppermint flavor - it's a great balance between the mint and the chocolate, especially with the ganache. It takes a long time to do all that creaming, but it's worth it. I also finally took the hint and stopped trying to make more than two layers, so that saved me a lot of agitation.

I'm not a big whipped cream fan (although unlike my sisters, I much prefer it homemade than from the can). I find it sort of tasteless, but the mint gives it something special. The recipe makes more than enough; you can probably halve it and still well cover the layers.

Hint o' Mint Truffle Cake
Adapted from Epicurious

Cake
1 3/4 cups white cake flour
3/4 cup unsweetened cocoa powder (I recommend Droste brand cocoa)
1 1/4 teaspoons baking soda
3/4 teaspoon salt
1/2 teaspoon baking powder
2 cups sugar
3/4 cup (1 1/2 sticks) unsalted butter, at room temperature
3 large eggs, at room temperature
3 teaspoons vanilla extract
1 teaspoon peppermint extract
1 1/2 cups buttermilk, at room temperature

Ganache Filling
3.5oz Lindt mint chocolate bar (or other high quality mint chocolate bar), chopped (optional: reserve 2 of the large squares for the garnish)
1/2 cup whipping cream

Mint Whipped Cream
3 cups chilled whipping cream
1 teaspoon peppermint extract
1/4 cup powdered sugar, sifted
1/4 teaspoon cream of tarter

Preheat oven to 350F. Butter and flour two 10-inch cake pans with high sides (1 1/2-inch-high sides or higher). Line bottom of pans with parchment paper.

Sift first 5 ingredients into medium bowl. Using electric mixer, beat sugar and butter in large bowl until very pale yellow and fluffy, about 6 minutes (see photo below). Be sure to stop and scrap the bowl at least once every two minutes.

Add eggs 1 at a time, beating 2 minutes after each addition (yes, I know it's a lot but trust me). Mix in vanilla and the peppermint extracts. Add dry ingredients alternately with buttermilk in 3 additions each, beating until well blended. Divide batter equally among prepared pans; smooth top of batter.

Bake cakes until tester inserted into center comes out with some moist crumbs still attached, about 25 minutes. Cool cakes in pans on racks 15 minutes. Turn cakes out onto racks; peel off paper. Let the cakes cool for about 10 minutes. Transfer each cakes on a plate.

Heat the whipping cream in the microwave in a glass measuring cup or heat proof bowl just until it comes to a boil (this should take 1-2 minutes depending on your microwave). You can also head the cream on the stove top if you should choose.

Remove the cream from the microwave and add the chopped chocolate. Let it sit for about a minute and then slowly stir the melted chocolate and cream together until they are well combined. Using a big spoon or rubber spatula, spread half the chocolate on the top of each cake, being sure to saturate each cake.

Put the cakes in the refrigerator for at least 1/2 hour or overnight until the ganache is good and firm. Put your whisk attachment and metal mixing bowl in the fridge now too (this will make your whipped cream come out better).

When you're ready to assemble the cake, remove whisk attachment, metal bowl, cream, the two cake layers from the fridge and place one on a cake board or plate (if you haven't already done so.)

To make the whipped cream, beat cream on the highest setting until it has soft peaks (if you're using a stand mixer, this will only take a minute or two, but if you're using a hand mixer, it could take 5 minutes or longer). Add powdered sugar, cream of tarter, and extract until stiff peaks form.

Spread 1 1/4 cups whipped cream on top of the cake. Top with second cake, making sure the chocolate ganache side is face down against the whipped cream (you're essentially forming a ganache/whipped cream sandwich). Spread remaining whipped cream over top and sides of cake. Refrigerate at least 1 hour and up to 6 hours.

To make the garnish, use a sharp knife and slice very thin, long strips of chocolate. Pile it in the center of the cake just before you're ready to serve.

Thursday, December 17, 2009

Sables by Two Sisters


Sarah here. My sables (top) turned out pretty well, actually. I made them for my suite Christmas party (more on that later). The thing I've found about this sable recipe is that every time I make it it gets worse - in presentation, not taste. The first time I made them, which was for my grandmother after she got her hip replaced, they looked just like they do in the book - perfectly round, white and even. Every time, they've gotten more raggedy, burnt and irregular, no matter how I try. I even use an empty paper towel roll, as Dorie suggests, to make them round. But I may have discovered the secret.

When I made these, I made the green ones first. They were fine, but not great. They were either too thick or they cracked. I sighed and accepted that that seems to be the reality for sables when I make them. But then a strange thing happened. Well, not that strange - as the green ones cooked, the red ones began to thaw (they had both been living in the freezer for a couple of days). Suddenly, the log was easy to cut, and the cookies looked like they should. However, they were also now warm, so I just popped them into the freezer for five minutes so they wouldn't spread. Presto, nice round, even sables! And the green and red sugaring looked great! I think that from now on when I make these, I will let the dough soften before I cut them. The red ones didn't crumble or crack at all. Plus, they had all the pure butter-and-sugar goodness that always comes with sables, no matter how bad they look.

Rebecca here. My sables (bottom) were really crumbly. Almost too crumbly. Maybe in fear of not over-mixing, I under-mixed? Not sure. My first log of dough almost fell apart as I cut them, but my second log came out fine. Go figure. You can see the difference between my two batches below. Either way, both the good looking ones and the bad looking ones tasted delicious. I would highly recommend making this recipe, especially if you have the patience to work with the dough a bit.

Here are Rebecca's two sables:


Sables Recipe
2 sticks (8 ounces) unsalted butter (preferably high-fat, like Plugra), softened at room temperature
1/2 cup granulated sugar
1/4 cup confectioners' sugar, sifted before measuring
1/2 teaspoon salt, preferably sea salt
2 large egg yolks, preferably at room temperature
2 cups all-purpose flour.
For the decoration (optional):
1 egg yolk
Crystal or dazzle sugar.
1. Working in a mixer fitted with a paddle attachment, beat the butter at medium speed until it is smooth and very creamy. Add the sugars and salt and continue to beat until smooth and velvety, not fluffy and airy, about 1 minute. Reduce the mixer speed to low and beat in 2 egg yolks, again beating until well blended.


2. Turn off the mixer, pour in the flour, drape a kitchen towel over the mixer and pulse the mixer about 5 times at low speed for 1 or 2 seconds each time. Take a peek; if there is still a lot of flour on the surface of the dough, pulse a couple of more times; if not, remove the towel. Continuing at low speed, stir for about 30 seconds more, just until the flour disappears into the dough and the dough looks uniformly moist. If you still have some flour on the bottom of the bowl, stop mixing and use a rubber spatula to work the rest of it into the dough. (The dough will not come together in a ball -- and it shouldn't. You want to work the dough as little as possible. What you're aiming for is a soft, moist, clumpy dough. When pinched, it should feel a little like Play-Doh.)
3. Scrape the dough onto a work surface, gather it into a ball and divide it in half. Shape each piece into a smooth log about 9 inches long (it's easiest to work on a piece of plastic wrap and use the plastic to help form the log). Wrap the logs well and chill them for at least 2 hours. The dough may be kept in the refrigerator for up to 3 days or frozen for up to 2 months.
4. When ready to bake, center a rack in the oven and preheat the oven to 350 degrees. Line a baking sheet with a silicone baking mat or parchment paper and keep it at the ready.
5. To decorate the edges of the sables, whisk the egg yolk until smooth. Place one log of chilled dough on a piece of waxed paper and brush it with yolk (the glue), and then sprinkle the entire surface of the log with sugar. Trim the ends of the roll if they are ragged and slice the log into 1/3-inch-thick cookies.
6. Place the rounds on the baking sheet, leaving an inch of space between each cookie, and bake for 17 to 20 minutes, rotating the baking sheet at the halfway point. When properly baked, the cookies will be light brown on the bottom, lightly golden around the edges and pale on top. Let the cookies rest 1 or 2 minutes before carefully lifting them onto a cooling rack with a wide metal spatula. Repeat with the remaining log of dough. (Make sure the sheet is cool before baking each batch.)

Tuesday, December 15, 2009

(Unofficial) Martha Stewart's Cupcake Club: Gingerbread Cupcakes


One of the things that I always wanted to do was be part of a baking group.  I think it is a great way to expand my skills and to try new things with baking that I might not otherwise do.  However, many baking groups, like Tuesdays with Dorie, want you to bake and post once a week, which I am just not up to doing.

In my blog travels, I came across Martha Stewart's Cupcake Club.  It is a group of people who are baking their way through Martha Stewart's book, Cupcakes.  Now, I have no particular attachment to Martha Stewart (she's no Dorie, after all) but I do love cupcakes and the posting of once a month (with a possible bonus each month) sounds just about right.  In addition, Martha has all these cute decorating ideas and step by step directions, and I have been wanting to improve on my decorating skills, so it seems like a good match.

However, I have not been officially approved as a member of the group yet (there is a waiting list), so I thought I would bake along unofficially until I am part of the group.

These cupcakes, which come from page 246, seem just right for the Christmas season.  Now, being Jewish, there is no Christmas in our house, but that doesn't mean we can't enjoy a little gingerbread once and a while.  These cupcakes were not quite spicy enough for me.  I actually thought they were too sweet and it overpowered the gingerbread flavor.  It is only at the end that you get a little kick from the spices.  If I make these again, I will cut back on the sugar.

I made her recommended frosting -- fluffy white frosting.  I made 3/4 of the recipe and used less sugar than she called for.  I had a lot left over, so I might make only half when frosting 19 cupcakes (which is how many I got).  I cut back on the sugar because I knew that I would find it too sweet with all the sugar in the frosting together with the cupcakes.  I think these cupcakes would be good (or even better) with chocolate or cream cheese frosting.

Sorry there was no decorating this time.  Martha suggests gingerbread cookie cutouts, but I just didn't have the time or energy to make them.  Sarah made them at school -- perhaps we should have joined forces.

Monday, December 14, 2009

Ethnic Flavor: Jelly Donuts (Sort-of)


In case you don't know, we are currently in the middle of the holiday of Hanukkah (or Chanukkah or Chanukah or Hanukah or about a million other ways to spell it).  Hanukkah is a holiday where we commemorate the miracle of oil that was only supposed to last for one day and instead lasted for eight days by eating lots and lots of foods fried in oil.  Traditional Hanukkah foods (at least for Jews of eastern European descent) are latkes -- potato pancakes friend in oil -- and sufganiyot -- jelly or other filled donuts.

Where I currently live in Texas, there are no jelly donuts that are kosher, so none that we can bring into our house, so I figured that I would try to make some.  I turned to my friend Ari, who has a blog called Baking and Books, for the recipe.  I had seen it on her blog last year and they looked sooo good (you should really check them out).

However, despite all the effort, something went wrong.  I think the oil was way to hot because the donuts got super brown before they were cooked on the inside.  Ari says to cook the donuts for 30 seconds on each side at 375 degrees, which is where I thought my oil was, but they would have been charred, black balls at that point.  And, when I took them out, they were round and then all the uncooked dough exploded out of them, leaving them with the funny shape you see above (sorry for the terrible picture -- the donuts were made and consumed at night). 

I figured I could not make them any worse, so I decided to bake them after I fried them to see if I could get them to cook through.  I covered them (since they didn't need any more browning) and baked them for 20 minutes at 350 and they actually turned out great.  Aside from their funny shape, they were cooked through on the inside and the dough was delicious.  I injected them with jelly after they were cooked, since I was afraid I would not be able to seal them well enough (and they would have become an unsalvageable disaster, so I am glad I did that).  I used this new, seedless Smuckers Black Raspberry, which was also great.

I think all the problems were my fault.  I blame myself, not the recipe.  You should try them.  I will try them again, the next time I want my whole kitchen to smell like oil, which may not be until next Hanukkah!

You can find the recipe here.

PS -- If you are wondering where Sarah has been, it is finals and she is a college girl!

Friday, December 11, 2009

Fresh Baked Bread is Mmmm, mmmm, good


I have said before how much I love the King Arthur Flour Blog, and I really, really do.  The recipe for crusty white bread came along at exactly the right moment.  A couple of weeks ago we had soup in our house, we bought a loaf of what we thought was crusty bread.  Turned out, it was not at all crusty and not even that tasty, despite outward appearances.  The next time we had soup, we tried again.  The bread was somewhat more crusty, but the crust kind of flaked off, so you lost that good crunch.  So, we came to the conclusion that there was no crusty bread here, as far as we could tell.

Then, I saw a blog post on King Arthur Flour for easy, crusty bread and I knew I had to try it.  So, it was super easy -- you just mix flour, yeast, water and salt together, leave it to rise on the counter for two hours and then for up to a week in the fridge.  The longer you leave it in the fridge, the more the tang develops.  I hear that, in a week, it will taste like sourdough.  You have to plan ahead -- you can't mix and eat on the same day, but with a little planning you can have delicious, crusty bread.

You can find the recipe here.  I have read on various blogs that this is very similar to the Artisan Bread in Five Minutes a Day recipe.  Whatever recipe you use, I urge you to try this bread.  I don't think it is possible to screw this up.

Tuesday, December 8, 2009

Ethnic Flavor: Brooke's Mom's Mandelbrot


So, my friend Brooke has received a shout-out on this blog before, because she is the one who got me the great bowls that held the pudding.  However, I thought she deserved a proper posting because she is really an awesome person and a great friend.  And, she brought this mandelbrot into my life (via her mom), so just for that she gets a posting.

For those of you who are wondering what mandelbrot is, it is a lot like Jewish biscotti.  In fact, it might be the same thing.  However, this mandelbrot is not exactly like biscotti.  You see, I never thought I liked mandelbrot.  I don't go for the hard cookies, especially ones with nuts.  Then Brooke let me in on a little secret.  First, you don't have to put the nuts in.  Second, you don't have to bake it a second time.  So I don't, and it is delicious.  I'm not sure it is exactly mandelbrot, but it is delicious nonetheless.

When I moved here to Texas, I bought about 12 bags of parve (non-dairy) chocolate chips from Trader Joe's.  You see, I knew that I would be unable to get parve chips where I live (especially since there is no Trader Joe's -- yes, we are in mourning) so I decided that hoarding them was the answer.  And yes, I took them on the plane from New York to Texas, packed safely in my suitcase.

But back to the mandelbrot.  Usually this is a parve treat, served after Shabbat dinners of chicken or brisket, so you need the parve chips.  I have deemed this dessert good enough to use a bag of my precious chips, and that is really saying something.  I sub soy milk for the milk in the recipe, and they come out great.  You might think it is just a big chocolate chip cookie in a different shape, but once you make it, you'll see that it has a very pleasant crumbly texture, very much unlike a regular cookie.  It also freezes really well, so I will usually just make all three loaves and put one or two in the freezer until I need another parve dessert. 

Many thanks to Brooke and her mom for this recipe.

Brooke's Mom's Mandelbrot
Makes 3 loaves

1 stick margarine
1 cup sugar
3 beaten eggs
1 tsp vanilla
1 cup walnuts (optional)
2 cups chocolate chips
3 cups flour
2 tsp baking powder
Pinch of salt
Less than 1/4 cup milk (or soy milk)

Mix together the margarine and sugar.  Add the eggs, vanilla, nuts and chocolate chips and mix until combined.  Add the flour, one cup at a time, the baking powder and the salt and mix well.  Add the milk and mix until combined.

Take a foil covered baking sheet (I use a silpat, which works great) and make three moundy loaves.  These rise, so don't put them too close together, but you can probably fit them all on one cookie sheet.

Cook until golden brown, about 30 minutes.

If you want to make more traditional mandelbrot, slice them when cool and bake again for about 10 minutes.  If you don't want to bake them again, just slice and serve.

Wednesday, December 2, 2009

Devious Cornbread


I have written about my suitemates before, not always in the most flattering of terms. ("They are all very thin. They think that cauliflower makes the perfect dessert. They're in Running Club.") But if Jen's recent behavior don't beat all, I don't know what does. She decided to embark on some moronic "challenge" where all she eats are fruits and vegetables. Healthy, except the part where you get no protein, fat or carbohydrates. I was very against this idea, and so I fought against it the only way I knew how – telling her so, loudly and obnoxiously. And baking.

Jen LOVES cornbread. It is her favorite food. And why not? Cornbread is tasty, nutritious (sorta) and easy to make. All you have to do is observe our coffee table, which currently has two bags of cornbread on it; we all know how much Jen loves cornbread, and so whenever the Ivy Room is selling it, we all buy a bag to bring to her. BECAUSE WE CARE ABOUT HER AND WANT HER TO EAT FOOD.

So I devised a devious, devious plan to get her to break her ridiculous diet. I whipped up a batch of cornbread, and when she came in, I was sitting there, smiling and offering her a piece of still-warm cornbread. "I'll eat this later," she said, taking it to her room with her. I wondered if she was going to eat it in secret. I had just found out, to my delight, that our suitemate Emily had failed the "challenge" thanks to my delicious cornbread!

Later that night, I admitted the plan to Jen. "And here I thought you were trying to be nice!" she exclaimed. "And I was trying to spare your feelings by taking the cornbread to my room and saying I would eat it later." Then she and Emily got into an involved discussion over whether or not Jen's saving the cornbread rather than eating it proved that she loved it more or less than Emily. It was involved.

Now Jen's diet is over and the bags of cornbread on our coffee table will soon be gone, but the cornbread recipe lives on! It was so delicious. I worried it would be too sweet, and if you like Southern-style cornbread it probably will be, but for me (and more importantly for Jen) it was just right. It was fluffy, moist and totally low-maintenance; a breeze to put together, and it baked like a dream, perfectly evenly. I may have to make some more, now that Jen is done, to prove that I'm not just a devious witch and what women's magazines would call a "bad friend" for trying to break her diet.


Cornbread Recipe
from AllRecipes

Ingredients

  • 1/2 cup butter
  • 2/3 cup white sugar
  • 2 eggs
  • 1 cup buttermilk
  • 1/2 teaspoon baking soda
  • 1 cup cornmeal
  • 1 cup all-purpose flour
  • 1/2 teaspoon salt

Directions

  1. Preheat oven to 375 degrees F (175 degrees C). Grease an 8 inch square pan.
  2. Melt butter in large skillet. Remove from heat and stir in sugar. Quickly add eggs and beat until well blended. Combine buttermilk with baking soda and stir into mixture in pan. Stir in cornmeal, flour, and salt until well blended and few lumps remain. Pour batter into the prepared pan.
  3. Bake in the preheated oven for 30 to 40 minutes, or until a toothpick inserted in the center comes out clean.

Dorie's Chocolate Pudding: Not Like Jello


So, first let me say that it is really, really hard to photograph chocolate pudding. It just looks kind of...yuck. Even in the cute bowls that my friend Brooke gave me and are really ice cream bowls. If anyone out there has any suggestions for photographing pudding (or food in general), let me know. I am happy for the tips.

However, even if it looks yucky, it tastes YUMMY! Rich but light at the same time. I do think it would have benefited from a dollop of whipped cream, which I will try to remedy the next time I eat it. This was some seriously good pudding. Now, I like Jello pudding as much as the next person, but if you are looking for a real treat, this pudding is it. My pudding was a little more like mousse in texture than pudding, but it was still delicious.

I made some modifications to Dorie's recipe. First, instead of 2 1/4 cups of whole milk, I used one cup of skim and 1 1/4 cups of whole. I don't think it affected the texture or the taste at all. Second, I don't have a food processor for dairy (it is parve, so that I can use it to make things like sauces and such), so I used a blender instead. I wonder if use of the blender contributed to the mousse-like texture, since it may have gotten more air than with a food processor. Third, I didn't put it back in the blender at the end of the recipe -- I just whisked in the butter, melted chocolate and vanilla. I know this is ok, because Dorie herself said so. Oh, and I don't like skin on my pudding, so I made a tight seal with the saran wrap before putting it in the fridge. Finally, I didn't put it in ramekins, but it one big container.

Here is the recipe (from doriegreenspan.com and Baking from My Home to Yours):

CHOCOLATE PUDDING

Makes 6 servings

2 1/4 cups whole milk

6 tablespoons sugar

2 tablespoons unsweetened cocoa powder

2 tablespoons cornstarch

1/4 teaspoon salt

1 large egg

2 large egg yolks

5 ounces bittersweet chocolate, melted and still warm

2 tablespoons unsalted butter, cut into 4 pieces, at room temperature

1 teaspoon pure vanilla extract

Getting Ready: Have six ramekins or pudding cups, each holding 4 to 6 ounces (1/2 to 3/4 cup), at hand.

Bring 2 cups of the milk and 3 tablespoons of the sugar to a boil in a medium heavy-bottomed saucepan.

While the milk is heating, put the cocoa, cornstarch and salt into a food processor and whir to blend. Turn them out onto a piece of wax paper, put the remaining 3 tablespoons sugar, the egg and egg yolks into the processor and blend for 1 minute. Scrape down the sides of the bowl, add the remaining 1/4 cup milk and pulse just to mix, then add the dry ingredients and pulse a few times to blend.

With the machine running, very slowly pour in the hot milk mixture. Process for a few seconds, then put everything back into the saucepan. Whisk without stopping over medium heat - making sure to get into the edges of the pan - until the pudding thickens and a couple of bubbles burble up to the surface and pop (about 2 minutes). You want the pudding to thicken, but you don't want it to boil, so lower the heat if necessary.

Scrape the pudding back into the processor (if there's a scorched spot, avoid it as you scrape) and pulse a couple of times. Add the chocolate, butter and vanilla and pulse until everything is evenly blended.

Pour the pudding into ramekins. If you don't want a skin to form (some people think the skin is the best part), press a piece of plastic wrap against the surface of each pudding to create an airtight seal. Refrigerate for at least 4 hours.

Sunday, November 29, 2009

Experimental Birthday Cake


Rebecca: We must be the only bloggers not posting pumpkin recipes.
Sarah: That's because pumpkin is gross.
Rebecca: True.

So if you were wondering why we weren't posting pumpkin recipes, there's your answer.

And now a story: last November, came time for my friend Melissa's birthday. I gave her the choice of a couple of cakes, and she picked one that had a meringue topping. I was still pretty skittish about meringue at the time, and that combined with my ghetto baking made for kind of a disastrous result - namely, an undercooked cake, topped with meringue...that had a heat coil imprint on it from being too close to the top of the oven. Oy.

So for Melissa's birthday this year, I wanted to make a simple but delicious cake, and thus I tried a little experiment. I didn't have a recipe off the top of my head, and so I just looked up "birthday cake recipe" on Google and picked the first result. (Okay, not the first - the first was from AllRecipes, which is wonderful but I worried would be too hit-or-miss for someone else's birthday cake, and the second was from Wilton, so I picked the third result.) It came from Smitten Kitchen, and the author claimed that it was, in fact, the BEST birthday cake. So that was a pretty tall order to live up to.

One thing that I really liked about this cake was how tall it grew in the oven. This is great if you are trying to make a layer cake, which I was! Unfortunately, I am a layer-making moron, so despite the obliging height of the cake, I still only ended up with three layers, and one was cracked. C'est la vie. The actual taste was not quite what I look for in a yellow cake - it was a little too heavy and dry. Then again, I'm probably too used to the Duncan Hines stuff, and who knows what sort of crap they put in their mix to make it taste like that. All in all, I would say it was pretty good.

The frosting was even better. It was easy to make, easy to spread and pretty-looking. I made a crumb coat but I didn't actually need to; the frosting spread evenly and beautifully. Plus, it tasted really good. My suitemates and I were eating it out of the bowl, and one of them commented that it tastes like ganache (only it doesn't have all that heavy cream!)

I thought the cake looked a little boring, so I added some powdered sugar around the edges. Classay. I don't really know what it tasted like altogether, since I gave it to Melissa, but I did get to try the frosting with pieces of the layer that had fallen apart, and I was quite pleased with the result. Definitely better than last year's birthday cake!

Yellow Cake Recipe

4 cups plus 2 tablespoons cake flour (not self-rising)
2 teaspoons baking powder
1 1/2 teaspoons baking soda
1 teaspoon salt
2 sticks (1 cup) unsalted butter, softened
2 cups sugar
2 teaspoons pure vanilla extract
4 large eggs, at room temperature
2 cups buttermilk, well-shaken

Preheat oven to 350°F. Butter two 9-inch round cake pans and line with circles of parchment paper, then butter parchment. (Alternately, you can use a cooking spray, either with just butter or butter and flour to speed this process up.)

Sift together flour, baking powder, baking soda, and salt in a medium bowl. In a large mixing bowl, beat butter and sugar in a large bowl with an electric mixer at medium speed until pale and fluffy, then beat in vanilla. Add eggs 1 at a time, beating well and scraping down the bowl after each addition. At low speed, beat in buttermilk until just combined (mixture will look curdled). Add flour mixture in three batches, mixing until each addition is just Incorporated.

Spread batter evenly in cake pan, then rap pan on counter several times to eliminate air bubbles. (I like to drop mine a few times from two inches up, making a great big noisy fuss.) Bake until golden and a wooden pick inserted in center of cake comes out clean, 35 to 40 minutes. Cool in pan on a rack 10 minutes, then run a knife around edge of pan. Invert onto rack and discard parchment, then cool completely, about 1 hour.

Frosting Recipe

15 ounces semisweet or bittersweet chocolate, chopped
1 1/4 teaspoons instant espresso (optional, but can be used to pick up the flavor of average chocolate)
2 1/4 cups sour cream, at room temperature
1/4 to 1/2 cup light corn syrup
3/4 teaspoon vanilla extract

Combine the chocolate and espresso powder, if using, in the top of a double-boiler or in a heatproof bowl over simmering water. Stir until the chocolate is melted. (Alternately, you can melt the chocolate in a microwave for 30 seconds, stirring well, and then heating in 15 second increments, stirring between each, until the chocolate is melted.) Remove from heat and let chocolate cool until tepid.

Whisk together the sour cream, 1/4 cup of the corn syrup and vanilla extract until combined. Add the tepid chocolate slowly and stir quickly until the mixture is uniform. Taste for sweetness, and if needed, add additional corn syrup in one tablespoon increments until desired level of sweetness is achieved.

Let cool in the refrigerator until the frosting is a spreadable consistency. This should not take more than 30 minutes. Should the frosting become too thick or stiff, just leave it out until it softens again.


Thursday, November 19, 2009

Easy Yummy Chocolate Cookies


One of my favorite blogs is the
King Arthur Flour Blog. They make lots of things that sound really good and they have amazing step by step pictures of all their recipes, so you know if you are doing something wrong. They also often highlight new products, many of which I want, but haven't yet given in to buying.


When I saw these cookies on the blog, I knew I had to make them immediately. They looked sooo good. However, since my husband doesn't like chocolate, I needed an excuse. My community is donating baked goods to families of hospice patients and I am sure that they will love these cookies.


The dough of these cookies was really stiff and they didn't spread very much in the oven. When I opened the oven after 10 minutes, I was sure the cookies weren't done, but I took them out anyway, and they actually were. They are really soft when they come out, and they get firmer as they cool. They were really good, although I think I should have used fewer chocolate chips -- it seemed like there were too many for the dough. When I make them again, I will use 3/4 of a cup of each kind of chip. I also want to try these with white chocolate chips, but I didn't have any. I also didn't have espresso powder, so I used instant coffee and it came out well. It really boosted the flavor, and it did not taste like coffee at all.


You can find this delicious recipe here and don't forget to check out the blog post about the cookies (where you can find the amazing pictures).

Wednesday, November 11, 2009

Adventures with the Ice Cream Maker: Ben & Jerry's Got There First

Chocolate Fudge Brownie ice cream by Ben & Jerrys has always been one of my favorite ice cream flavors. You see, I am not a big fan of stuff in my ice cream, since I don't generally like to bite on hard chunks while eating it (exceptions were made for this ice cream, since it is just too good), so Chocolate Fudge Brownie is perfect because it has the brownies in it, but they are soft.

I decided to make my own, since it is still very warm here (80 degrees in November -- WHAT?!?!). I used Philadelphia Style chocolate ice cream (no eggs, no custard to make, which saves time) from David Lebovitz's The Perfect Scoop. Then I made a box of Ghirardelli brownie mix and allowed it to cool. Yes, I could have made them from scratch, but I had the mix, so it was just easier. When the brownies were cool, I cut it into small squares (really, really small) and also crumbled some up and I put it into the ice cream in the last minute of churnning. In retrospect, I think I put the brownies in a bit too early, because many of them turned into crumbs, instead of staying in chunks, but it was still delicious. The brownies were still soft even when the ice cream was frozen, and the whole thing had an intense chocolate flavor that was almost over the top (but not quite).

Here is the ice cream recipe:

Chocolate Ice Cream (Philadelphia Style)

2 ¼ cups heavy cream

6 tablespoons unsweetened Dutch-process cocoa powder

1 cup sugar

Pinch of salt

6 ounces unsweetened chocolate, chopped

1 cup whole milk

1 teaspoon vanilla extract

Whisk together the cream, cocoa powder, sugar, and salt in a large saucepan. Heat the mixture, whisking frequently, until it comes to a full, rolling boil (it will start to foam up). Remove from the heat and whisk un the chocolate until it’s completely melted, then whisk in the milk and vanilla. Pour the mixture into a blender and blend for 30 seconds, until very smooth.

Chill the mixture thoroughly in the refrigerator, then freeze it in your ice cream maker according to the manufacturer’s instructions.

Saturday, November 7, 2009

Baking with Dorie!


So, as those of you who read this blog — hell, as those of you who have come within hearing range of me in the last month — know, I was signed up to take a master class with Dorie Greenspan at Dalton. This was pretty much the most exciting thing to happen to me, ever. Dorie is the hero of the Baking Sisters! She even has her own tag on our blog!


The inimitable Dorie Greenspan, as photographed by a highly imitable photographer (me, not that you would really want to imitate my carefully studied "blurry" technique)

In the newly renovated Dalton cafeteria, I was paired with a lovely woman named Linda, who is incidentally a Brown alum. I think that I was the more experienced baker, which made me relieved — I had thought that everyone was going to be an expert! But we made a good team.

We baked the French Yogurt Cake from page 224 of Baking from My Home to Yours. We were quite spoiled; the ingredients were all measured out for us, and the lemons were all pre-zested. Actually, to be honest, zesting is one of my favorite things to do, but luckily I was not deprived of my ABSOLUTE FAVORITE step — namely, rubbing the zest and sugar! According to Linda, who studied science, we were "infusing" the sugar with the citrus' oils. Hmmm, I will take it from her.

The cake was simple but yum. When I went home, I made a regular lemon pound cake glaze for it (just lemon juice and confectioner's sugar), even though she suggests a marmalade glaze. We didn't have an marmalade, but I thought it tasted good anyway. I prefer a prominent lemon flavor, and I think the glaze added to it. The cake seems very versatile; you could have it for breakfast, brunch, dessert, whatever, you can top it with all sorts of glazes, you can serve it with fruit. It's a good recipe to have around.

Our cakes before they went into the oven

My cake after it came out of the oven

Dorie also made Tarte Noir. There was neither time nor equipment for the whole class to make it, but that's okay with me since I've made it about a million times. Everyone seemed really impressed that making something so elegant-looking and delicious could be so easy.

I learned a lot of things at the class. Here are some of them:

1) All this time, I had been folding incorrectly. I always thought folding just meant gently scooping the batter up with a spatula and then sort of dragging it through. Turns out you are supposed to turn the bowl a quarter of the way each time, and scrape the batter from the sides.

2) If you are making pie dough in a mixer (as opposed to a food processor), you should add the ingredients in opposite order. This is especially useful advice for me, since I currently don't have a food processor in my possession at school, though I'll probably get one for next year.

Dorie telling us about a chef who makes cookies with one hand literally behind his back. She used this anecdote as an illustration of the importance of adding ingredients in the right order. Also, to demonstrate the inferiority of American butter. Long story.

3) To make pie dough come together, blend it with the heel of your hand. This is some technique that has a French name, but don't ask me what it is because I wasn't taking notes.

4) To make dull ganache shiny again, use a hairdryer! Dorie had made miniature tarte noirs (tartes noir?) for the whole class, and they were DELICIOUS, but when they came out of the fridge the ganache was dull. So...


And voila! Shiny and ready for whipped cream!


This was such a wonderful experience for me. I wish that Rebecca could have been there to share it with me, but I know she was there in spirit! Dorie Greenspan is such a warm, friendly and genuine person. She didn't even seem put off by all my geeky fan-girling, and patiently signed my cookbook as well as labels for Rebecca and my friend Allison to paste into their copies. Plus, best of all, she has been to this blog! So, Dorie, if you are reading this now, it was wonderful to meet you! Thank you for many delicious memories!

Me with Dorie- eyes open

Me with Dorie- eyes closed

French Yogurt Cake Recipe

Ingredients
1 cup all-purpose flour
1/2 cup ground almonds (or, if you'd prefer, omit the almonds and use another 1/2 cup all-purpose flour)
2 teaspoons baking powder
Pinch of salt
1 cup sugar
Grated zest of 1 lemon
1/2 cup plain yogurt
3 large eggs
1/4 teaspoon pure vanilla extract
1/2 cup flavorless oil, such canola or safflower

For the Glaze:
1/2 cup lemon marmalade, strained
1 teaspoon water

Getting Ready:
Center a rack in the oven and preheat the oven to 350 degrees F. Generously butter an 8 1/2-x-4 1/2-inch loaf pan and place the pan on a baking sheet.

Whisk together the flour, ground almonds, if you're using them, baking powder and salt.

Put the sugar and zest in a medium bowl and, with your fingertips, rub the zest into the sugar until the sugar is moist and aromatic. Add the yogurt, eggs and vanilla and whisking vigorously until the mixture is very well blended. Still whisking, add the dry ingredients, then switch to a large rubber spatula and fold in the oil. You'll have a thick, smooth batter with a slight sheen. Scrape the batter into the pan and smooth the top.

Bake for 50 to 55 minutes, or until the cake begins to come away from the sides of the pan; it should be golden brown and a thin knife inserted into the center will come out clean. Transfer the pan to a rack and cool for 5 minutes, then run a blunt knife between the cake and the sides of the pan. Unmold, and cool to room temperature right side up on the rack.

To Make the Glaze:
Put the marmalade in a small saucepan or in a microwave-safe bowl, stir in the teaspoon of the water and heat until the jelly is hot and liquefied. Using a pastry brush, gently brush the cake with the glaze.


Related Posts with Thumbnails