Thursday, July 22, 2010

Further Cupcakes for a 21-Year-Old


I'm back, readers! In fact, I've been back in America for two weeks, but I've been a shamefully negligent blogger, considering one of the first things I did upon my return was to plan what I was going to bake now that I was reunited with my darling oven. Sure, the house was in sorry condition baking-wise (the baking powder, for one, had expired in January, which is when I left), but I soon had it back in shape, and luckily, I had a lot of opportunities to bake.

The favorite recipe I made was for my friend Drew's birthday. He was turning 21 and I saw a double opportunity: to bake yummy cupcakes and to buy my first alcohol, legal or otherwise, in the United States. Dude, my first alcohol purchase would be for cupcakes. Faithful readers will know that I made stout cupcakes for my own birthday and was extremely pleased, but this recipe takes it up a notch, including whiskey and Bailey's. It's also known as an Irish car bomb cupcake, after the truly nauseating-sounding drink. But never fear! This is anything but nauseating.

I accidentally bought some oatmeal stout, which is quite bitter. Plus, I don't know how to operate a bottle opener, and I cut my fingers several times trying to open it. Eventually, I opened it on the side of the counter, which made me feel like quite a badass until I realized that opening a beer bottle on a counter is not badass if you're doing it because you don't know how to operate a bottle opener. But I digress. Anyway, I ended up being pleased with the bitterness, because the frosting is very very sweet and the ganache has a slightly spicy kick, so the blend of the flavors prevented any one of them from being overwhelming.

The frosting is, as I said, extremely sweet, which was an issue for me. I followed the author's note about adding sugar one spoonful at a time and it did indeed thicken faster, but then I didn't want to keep adding sugar even though the frosting wasn't as thick as I wanted it to be because it would become too sweet. If you are having this issue I would recommend putting the cupcakes in the fridge so the frosting can set. I also doubled the recipe and it still didn't make enough, though maybe I was laying it on too thick, since I'm experimenting with the exciting world of piping and I'm still a novice. Nonetheless, this recipe was delicious! I would definitely recommend it for the next 21st birthday party you attend - or any other party, for that matter!

Chocolate Whiskey and Beer Cupcakes

From Smitten Kitchen

While the Guinness in the cake gets mostly baked out, the Baileys is fresh and potent, so if you’re making this for people who don’t drink, you’ll probably want to swap it with milk.

The Baileys frosting recipe makes a smallish amount of frosting — enough to just cover the cupcakes. Because they were so rich and this frosting so sweet, I felt it only needed a little. Double it if you want more of a towering effect.

Makes 20 to 24 cupcakes

For the Guinness Chocolate Cupcakes

1 cup stout (such as Guinness)
1 cup (2 sticks) unsalted butter
3/4 cup unsweetened cocoa powder (preferably Dutch-process)
2 cups all purpose flour
2 cups sugar
1 1/2 teaspoons baking soda
3/4 teaspoon salt
2 large eggs
2/3 cup sour cream

Ganache Filling (Updated to double it, based on many commenters suggestions — thanks!)
8 ounces bittersweet chocolate
2/3 cup heavy cream
2 tablespoons butter, room temperature
1 to 2 teaspoons Irish whiskey (optional)

Baileys Frosting (see Recipe Notes)
3 to 4 cups confections sugar
1 stick (1/2 cup or 4 ounces) unsalted butter, at room temperature
3 to 4 tablespoons Baileys (or milk, or heavy cream, or a combination thereof)

Special equipment: 1-inch round cookie cutter or an apple corer and a piping bag (though a plastic bag with the corner snipped off will also work)

Make the cupcakes: Preheat oven to 350°F. Line 24 cupcake cups with liners. Bring 1 cup stout and 1 cup butter to simmer in heavy large saucepan over medium heat. Add cocoa powder and whisk until mixture is smooth. Cool slightly.

Whisk flour, sugar, baking soda, and 3/4 teaspoon salt in large bowl to blend. Using electric mixer, beat eggs and sour cream in another large bowl to blend. Add stout-chocolate mixture to egg mixture and beat just to combine. Add flour mixture and beat briefly on slow speed. Using rubber spatula, fold batter until completely combined. Divide batter among cupcake liners, filling them 2/3 to 3/4 of the way. Bake cake until tester inserted into center comes out clean, rotating them once front to back if your oven bakes unevenly, about 17 minutes. Cool cupcakes on a rack completely.

Make the filling: Chop the chocolate and transfer it to a heatproof bowl. Heat the cream until simmering and pour it over the chocolate. Let it sit for one minute and then stir until smooth. (If this has not sufficiently melted the chocolate, you can return it to a double-boiler to gently melt what remains. 20 seconds in the microwave, watching carefully, will also work.) Add the butter and whiskey (if you’re using it) and stir until combined.

Fill the cupcakes: Let the ganache cool until thick but still soft enough to be piped (the fridge will speed this along but you must stir it every 10 minutes). Meanwhile, using your 1-inch round cookie cutter or an apple corer, cut the centers out of the cooled cupcakes. You want to go most of the way down the cupcake but not cut through the bottom — aim for 2/3 of the way. A slim spoon or grapefruit knife will help you get the center out. Those are your “tasters”. Put the ganache into a piping bag with a wide tip and fill the holes in each cupcake to the top.

Make the frosting: Whip the butter in the bowl of an electric mixer, or with a hand mixer, for several minutes. You want to get it very light and fluffy. Slowly add the powdered sugar, a few tablespoons at a time.

[This is a fantastic trick I picked up while working on the cupcakes article for Martha Stewart Living; the test kitchen chefs had found that when they added the sugar slowly, quick buttercream frostings got less grainy, and tended to require less sugar to thicken them up.]

When the frosting looks thick enough to spread, drizzle in the Baileys (or milk) and whip it until combined. If this has made the frosting too thin (it shouldn’t, but just in case) beat in another spoonful or two of powdered sugar.

Ice and decorate the cupcakes.

Do ahead: You can bake the cupcakes a week or two in advance and store them, well wrapped, in the freezer. You can also fill them before you freeze them. They also keep filled — or filled and frosted — in the fridge for a day. (Longer, they will start to get stale.)

Sunday, July 18, 2010

Melts in Your Mouth... M&M Cookies


Recently, our friend Brooke, of previous blogging fame, came to my neighborhood with her husband and daughter for Shabbat. My roommate and I were put in charge of making a dairy dessert, with no limitations other than the fact that Brooke prefers cookies to cake, and that there were going to be five of us at lunch.

Well, let's just say that I followed the first part of the directions better than the second part. I ended up making cookies two ways-- the other recipe can be found here, as previously blogged about-- and consequently, we had 100 cookies for five people. Better too much than too little, right? And now there are snacks in the freezer...

Anyway, I had made these M&M cookies a number of years ago, and Brooke really liked them then, so I thought I would make them again. But when I went to the store to buy the mini baking M&Ms, they were nowhere to be found. I had once tried making the mini recipe with regular sized candy, but I hadn't liked them because they turned out kind of mealy, so it was back to the drawing board.

I decided to take a recipe that I knew that I liked-- the standard Nestle Tollhouse cookie recipe and tweak it a little to make it hospitable to the M&Ms. As usual, I halved the butter, which was especially important in this recipe because the color of the candy runs if the batter is too wet. Other than that, I left out the nuts and replaced the chocolate chips with a medium bag of M&Ms. The results: delicious!

Friday, July 16, 2010

Sweet and Tangy: Raspberry Crumb Cake

I really love raspberry jam. To me, the combination of sweet and a little bit tangy is beyond delicious. So when I found a recipe for strawberry strusel cake in Kosher By Design Short on Time, I was very excited to make it, with the intention of replacing raspberry for strawberry. I was especially looking forward to the combination of crumb cake and a little bit of fruity flavor.

This cake is super easy to make, but I had a few problems with it. First, for some reason, it changed colors from a light yellow color to a brownish color in the oven. I was worried that one of the ingredients had caused it to go bad, but it still tasted delicious. The other issue was that the cake seemed to be too thick for its pan, so by the time the middle was cooked enough (and it was still pretty gooey), the outside was kind of dried out. I would make it again, but probably use a bigger pan so that the mixture could good more evenly. I also bet this cake would make excellent muffins, so I might try that next time too.

You can find the recipe here.

Thursday, July 15, 2010

MSC: Flourless Chocolate Cupakes


Can I just say that I love being part of a baking group?  Although I wish I could commit to something like Tuesdays with Dorie, I just can't make that kind of commitment to bake every week.  That is why I love the Martha Stewart Cupcake Club.  You only make one per month, but you get to see lots of new blogs and, best of all, I get to try things I might not have otherwise.

That is the case with this month's cupcakes, chosen by Lauryn of Bella Baker.  Her blog is really cute and she makes such beautiful stuff.  She chose flourless chocolate cupcakes, which I probably would never have made if it were not for this group.  I have made numerous flourless chocolate cakes before, especially during Passover, and they have all be fine, but nothing special.

Let me tell you, these were special.  These were so good.  They were rich and chocolately, but just the right size to eat without being overwhelmingly rich.  I think these would be just as good parve and they are totally Kosher for Passover, so I will be adding them to my list of Passover desserts.

These were not very hard to make, although folding in egg whites can be tricky. My only advice is to be gentle and don't worry if there are a few streaks of white in your batter.  My cupcakes pulled away from the wrapper as they baked, but it was not a big deal.  I would just plan not to serve them in the wrappers.

Martha suggests serving these with ice cream, which I didn't have, so I used whipped cream instead.  They were very good with the whipped cream and I liked the contrast of the light cream with the rich cake.  I guess this wouldn't work if you wanted to make them parve, but you could probably use raspberry sorbet and it would be delicious.

Thanks Lauryn!  This was a great pick and I am excited to make them again.

Tuesday, July 6, 2010

Happy (Late) 4th of July or A Great Use of SoCal Produce


As I think I mentioned before on this blog, I moved to LA this week.  We are very excited to be here in Southern California, especially because the fruit and veggies are so amazing.  I just love going to the farmer's market and tasting and buying all the yummy food.  This is a big change from where we were, where farmer's markers were sparse and local produce was almost non-existant (we were living in the desert).

As I caught up on blogs this weekend, I thought to myself, its too bad I could not bake this weekend and do something fun for the 4th of July.  There is so much beautiful fruit around.  However, with all the unpacking and trying to find our kitchen, no baking has taken place.

And then I remembered this tart.  I made it a few weeks back, when we were still in Texas, for an end of the year office party for my husband.  I didn't actually get to taste it (I had to send it whole to the party) but it got really positive reviews.  He said there were lots of desserts at the party and this was the only one that was finished.  It was super easy to make, I probably could have whipped it up quickly when our kitchen was unpacked.  It is light and summery and a great treat for a hot day, when delicious produce is calling your name.  I used blackberries and raspberries here, but I think you could really use any berry and probably other kinds of fruit as well.  It is just sweet tart dough, pastry cream and fruit, with an simple jelly glaze.  Yum!

The recipe is after the jump...

Wednesday, June 30, 2010

What's Black and White and Sweet All Over? Zebra Cookies!


Yes, I have been an absent delinquent. Many apologies. Unfortunately, crazy summer school and many jobs left me no time for baking in June, but now it's almost July and I'm back! For my grand reappearance, I chose to make the zebra cookies from Kosher By Design Short on Time. These cookies are really easy to make, and I also love how they look. However, they're a little too chocolately for me, so I don't know if I would make them again.

A couple of things. First, the recipe calls for them being made huge-- it says to roll them out bigger than golf balls. I made them considerably smaller and they still grew a lot in the oven. Also, you have to coat the cookies very heavily in the confectioners sugar, otherwise they absorb the sugar while they cook. Enjoy!

GIANT ZEBRA FUDGE COOKIES

1/2 cup canola OR vegetable oil

2 cups granulated sugar

2 cups all-purpose flour

1 cup good-quality Dutch process cocoa powder (such as Droste brand)

4 large eggs

1 teaspoon vanilla

2 teaspoons baking powder

Powdered sugar

Line 2 large cookie sheets or jelly-roll pans with parchment paper. Set aside. In bowl of an electric stand mixer, mix oil, granulated sugar, flour, cocoa powder, eggs, vanilla and baking powder, until a soft dough forms. Roll dough into 18 balls slightly larger than golf balls.

Fill a small bowl with powdered sugar and stir with a fork to break up any clumps. Place balls, one at a time, in bowl of powdered and toss to coat heavily and completely. Transfer to prepared pans. Leave room between dough balls, as the cookies spread during baking.

Bake in a preheated 350-degree oven 18 minutes. If you like, you can make smaller cookies; form walnut-sized balls and bake 12 minutes. Cool completely.

Makes 18 large cookies

Tuesday, June 29, 2010

Elegance in Miniature


Hey there readers, long time no blog. I'm currently in London doing research for my thesis, and thanks to the wonders of the pound-dollar exchange rate I can barely afford meals, let alone dessert ingredients. But after some passive-aggressive (okay, mostly just aggressive) prodding from Rebecca, I recalled that there were a lot of things I made way back in the day before I left for England that never saw the light of the blog.

I spent the last weekend in Paris - it's a hard life - visiting my friend Evan, and though we walked far and wide searching for good patisseries, they were all closed because it was Sunday! So sad. We ended up getting delicious ice cream instead, so all was not lost. But I thought in honor of our pastry fail, I'd blog about a very Parisian-type dessert, which I made for my dad's office party back in December.

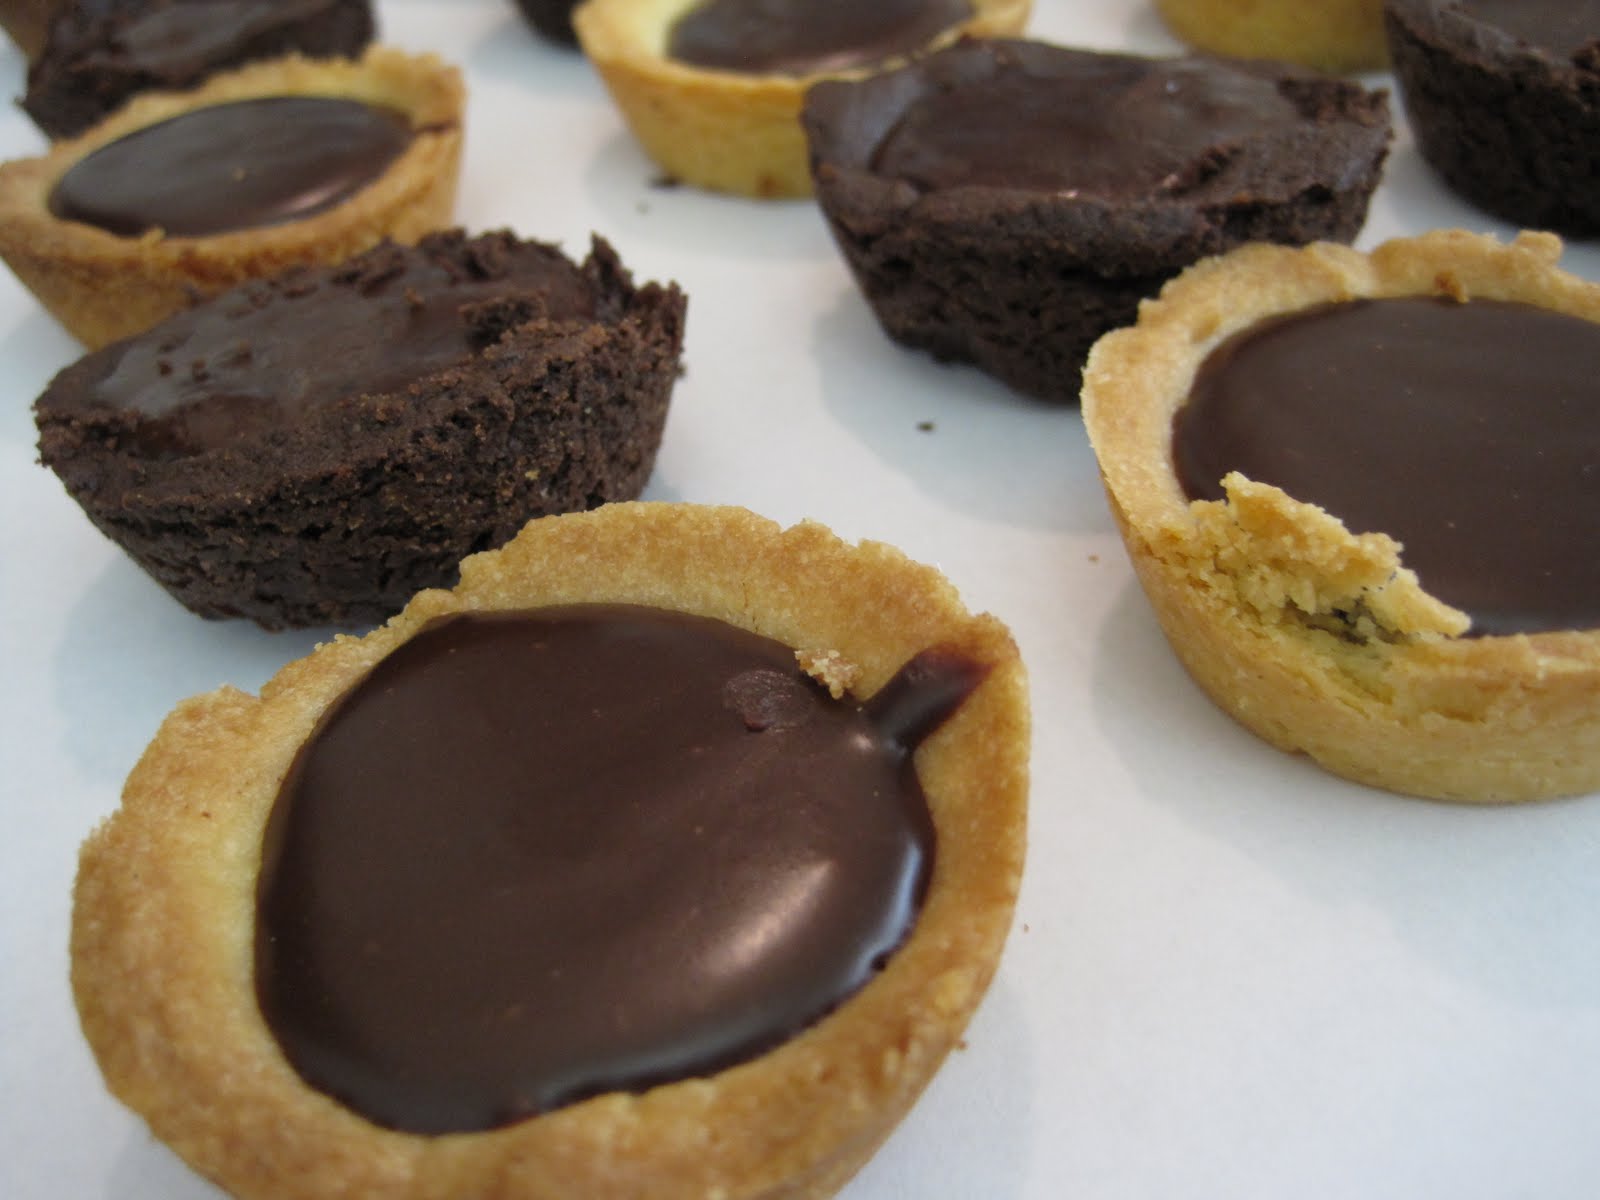
I've already written a bit about miniature tartes noir before, since Dorie Greenspan made them for the workshop at Dalton, and I've made regular-sized tarte noir many times, because it's as effortless as it is elegant. However, let me warn you that the minis, which are extremely cute, are not exactly effortless. This was mostly because I had a lot of trouble with the crust. I greased the pans very well but a lot of the crusts crumbled when I tried to take them out. Also, they puffed up in the oven, which normally isn't a big issue - you can just tamp it down with the back of a spoon - but because they're so small and delicate a little puffiness goes a long way towards diminishing the amount of space for ganache, and pushing on them too vigorously will break them. I tried to use pie weights for the second batch, a couple in each crust - BIG mistake, each one of them broke. If anyone had any suggestions as to how to get the crusts to cooperate, it would be greatly appreciated!

For the remaining non-maimed shells, the rest of the process was as simple and satisfying as ever, and the end result was delicious! (They were even better than usual; since it was for my dad's office party and not just some random whim, I was able to use Valhrona chocolate, yummmm!) They looked adorable and, according to my dad, they were a big hit at the party. However, I think that next time I'll make them in slightly bigger molds. It was just a little too time-consuming for me, especially considering that the charm of tarte noir is that it looks so professional and yet is so easy to make.

Tarte Noir, from Baking From My Home to Yours


Sweet Tart Dough

  • 1 ½ cups all-purpose flour
  • ½ cup confectioners’ sugar
  • ¼ teaspoon salt
  • 1 stick plus 1 tablespoon (9 tablespoons) very cold (or frozen) unsalted butter, cut into small pieces
  • 1 large egg yolk

Put the flour, confectioners’ sugar and salt in a food processor and pulse a couple of times to combine. Scatter the pieces of butter over the dry ingredients and pulse until the butter is coarsely cut in – you should have some pieces the size of oatmeal flakes and some the size of peas. Stir the yolk, just to break it up, and add it a little at a time, pulsing after each addition. When the egg is in, process in long pulses – about 10 seconds each – until the dough , which will look granular soon after the egg is added, forms clumps and curds. Just before you reach this stage, the sound of the machine working the dough will change – heads up. Turn the dough out onto a work surface and, very lightly and sparingly, knead the dough just to incorporate any dry ingredients that might have escaped mixing.

TO PRESS THE DOUGH INTO THE PAN: Butter a 9-inch fluted tart pan with a removable bottom. Press the dough evenly over the bottom and up the sides of the pan, using all but one little piece of dough, which you should save in the refrigerator to patch any cracks after the crust is baked. Don’t be too heavy-handed – press the crust in so that the edges of the pieces cling to one another, but not so hard that the crust loses its crumbly texture. Freeze the crust for at least 30 minutes, preferably longer, before baking.

TO FULLY BAKE THE CRUST: Center a rack in the oven and preheat the oven to 375 degrees F. Butter the shiny side of a piece of aluminum foil and fit the foil, buttered side down, tightly against the crust. (Since you froze the crust, you can bake it without weights.) Put the tart pan on a baking sheet and bake the crust for 25 minutes. Carefully remove the foil. If the crust has puffed, press it down gently with the back of a spoon. Bake for another 8 minutes or so, or until it is firm and golden brown – just make sure to keep a close eye on the crust’s progress – it can go from golden to way too dark in a flash.) Transfer the tart pan to a rack and cool the crust to room temperature before filling.

TO PATCH, IF NECESSARY: If there are any cracks in the baked crust, patch them with some of the reserved raw dough as soon as you remove the foil. Slice off a thin piece of the dough, place it over the crack, moisten the edges and very gently smooth the edges into the baked crust. Bake for another 2 minutes or so, just to take the rawness off the patch.

For the Filling:

  • 8 ounces bittersweet chocolate, finely chopped
  • 1 cup plus 2 tablespoons heavy cream
  • ½ stick (4 tablespoons) unsalted butter, cut into 4 pieces, at room temperature
  • 1 9-inch tart shell made with Sweet Tart Dough (From Baking: From My Home to Yours – recipe above)

Put the chopped chocolate in a heatproof bowl and have a whisk or a rubber spatula at hand.

Bring the cream to a boil, then pour half of it over the chocolate and let it sit for 30 seconds. Working with the whisk or spatula, very gently stir the chocolate and cream together in small circles, starting at the center of the bowl and working your way out in concentric circles. Pour in the remainder of the cream and blend it into the chocolate, using the same circular motion. When the ganache is smooth and shiny, stir in the butter piece by piece. Don’t stir the ganache any more than you must to blend the ingredients – the less you work it, the darker, smoother and shinier it will be. (The ganache can be used now, refrigerated or even frozen for later.)

Pour the ganache into the crust and, holding the pan with both hands, gently turn the pan from side to side to even the ganache. Refrigerate the tart for 30 minutes to set the ganache, then remove the tart from the fridge and keep it at room temperature until serving time. (Note – don’t cut right into it because the ganache won’t be set yet).


Related Posts with Thumbnails