Tuesday, September 22, 2009

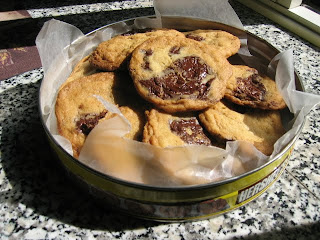
The Perfect Chocolate Chip Cookie?


Okay, before we begin today's post, I have some breaking news: I AM TAKING A MASTER CLASS WITH DORIE GREENSPAN! Yes, you read that correctly. Quake with jealousy.

Turns out that Dorie Greenspan's son went to our high school and graduated two years ahead of Rebecca, and she's doing a free master class for Dalton alumni. Don't know why, don't care why, but when Rebecca called me and told me the exciting news, I signed up immediately! Now I am counting the minutes until 10:00 on November 7th, when I will be meeting our muse/idol/hero/[your creepy noun of choice here.] Sadly, Rebecca won't be there, for obvious reasons, but I will take pictures and get autographs up the wazoo, so never fear.

And now, back to our regularly scheduled programming.

Our mom is a great lady. She is always there for us. She also works, and has been a great role model on how to balance work and family. (Or as she says: "I love you girls, but if I had had to stay home with you all day, I would have killed myself.") Anyway, I had this big problem with my housing. It's a long, sad story but the crux of it is that Brown University Office of Residential Life can suck it. Mommy was really helpful throughout the whole ordeal and it all worked out in the end (mostly). So in honor of her being the best mother, I thought I should make her the best chocolate chip cookies.

For those of you who somehow missed this - shame on you - the New York Times did a highly scientific search for the perfect chocolate chip cookie. They eventually settled on a Jacques Torres recipe. We're lucky enough to have a Jacques Torres location less than half a mile away, but I had never made the recipe because it seemed too fussy, what with its two types of flour, specifically shaped chocolate disks and minimum 24-hour chilling time. In my mind, chocolate chip cookies just should not be that high-maintenance. However, for my mother I was willing to try.

I admit, I didn't follow the recipe completely. I subsituted all-purpose flour for the bread flour and an all-purpose flour/cornstarch mix for the cake flour (my go-to substitution is 1 cup minus 2 tablespoons of flour plus two tablespoons of cornstarch- it seems to work well, something about the gluten blah blah blah). I also just used chopped-up Ghirardelli chocolate instead of the disks. This might have been a mistake, since the chocolate melted sort of strangely and spread out in a way that was somewhat unattractive, though still tasty. Lastly, I only chilled the dough for 21 hours, because I needed to make the cookies before my mother got home. Sue me. However, I do hear that you should chill for 36 hours to get the optimal interplay of flavors that the chilling is supposed to achieve. Maybe next time.

So in sum, I pretty much eliminated or mitigated everything that makes this cookie distinctive/fussy. And was it still the perfect chocolate chip cookie? No, probably not, though it was pretty darn good. The chilling really does bring out certain flavors, like the molasses in the brown sugar, that are otherwise hidden. My tip for you should you attempt the recipe is to space out the cookies widely, because they spread like crazy and bleed together. My question for you is: Do you have any strategies for how to add the salt? Reading about these cookies was the first time I realized the potential of salt in baked goods, but when I just sprinkled it on some of the cookies had way too much salt and some had way too little. Something to think about for next time I decide I want to make 36-hour cookies.

Recipe (from the New York Times Website)

Time: 45 minutes (for 1 6-cookie batch), plus at least 24 hours’ chilling
2 cups minus 2 tablespoons (8 1/2 ounces) cake flour
1 2/3 cups (8 1/2 ounces) bread flour
1 1/4 teaspoons baking soda
1 1/2 teaspoons baking powder
1 1/2 teaspoons coarse salt
2 1/2 sticks (1 1/4 cups) unsalted butter
1 1/4 cups (10 ounces) light brown sugar
1 cup plus 2 tablespoons (8 ounces) granulated sugar
2 large eggs
2 teaspoons natural vanilla extract
1 1/4 pounds bittersweet chocolate disks or fèves, at least 60 percent cacao content (see note)
Sea salt.
1. Sift flours, baking soda, baking powder and salt into a bowl. Set aside.
2. Using a mixer fitted with paddle attachment, cream butter and sugars together until very light, about 5 minutes. Add eggs, one at a time, mixing well after each addition. Stir in the vanilla. Reduce speed to low, add dry ingredients and mix until just combined, 5 to 10 seconds. Drop chocolate pieces in and incorporate them without breaking them. Press plastic wrap against dough and refrigerate for 24 to 36 hours. Dough may be used in batches, and can be refrigerated for up to 72 hours.
3. When ready to bake, preheat oven to 350 degrees. Line a baking sheet with parchment paper or a nonstick baking mat. Set aside.
4. Scoop 6 3 1/2-ounce mounds of dough (the size of generous golf balls) onto baking sheet, making sure to turn horizontally any chocolate pieces that are poking up; it will make for a more attractive cookie. Sprinkle lightly with sea salt and bake until golden brown but still soft, 18 to 20 minutes. Transfer sheet to a wire rack for 10 minutes, then slip cookies onto another rack to cool a bit more. Repeat with remaining dough, or reserve dough, refrigerated, for baking remaining batches the next day. Eat warm, with a big napkin.
Yield: 1 1/2 dozen 5-inch cookies.
Note: Disks are sold at Jacques Torres Chocolate; Valrhona fèves, oval-shaped chocolate pieces, are at Whole Foods.

Monday, September 14, 2009

Adventures with the Ice Cream Maker: BEST ICE CREAM EVER!!


So, when I read in David Lebovitz's The Perfect Scoop that this was his favorite ice cream in the whole book, I could not believe it. What is so great about Malted Milk Ice Cream? But then, I made it (with the third Baking Sister Rachel) and I understood. Oh boy, was this good. Smooth and creamy, with a good malt flavor in the ice cream, plus a crunch from the Whoppers that were folded into it. I can't wait to make this again. It was even good after the freezer accidentally stayed open all day and the ice cream melted and then refroze (yes, that was a bad day). I think that is the test of excellent ice cream -- that you want to eat it even when it is not at its best.

In other news, if there is anyone out there reading our blog, leave us a comment and let us know. We want to know if you are out there and we promise to respond!

And now, without further ado...
The recipe:
David Lebovitz's Malted Milk Ice Cream
Recipe by David Lebovitz
Ingredients
1 cup half-and-half
3/4 cup sugar
Pinch of salt
2 cups heavy cream
1/4 teaspoon vanilla extract
2/3 cup malt powder
6 large egg yolks
2 cups malted milk balls, coarsely chopped
Warm the half-and-half, sugar, and salt in a medium saucepan. In a large bowl, whisk together the heavy cream, vanilla, and malt powder and set a mesh strainer on top.
In a separate medium bowl, whisk together the egg yolks. Slowly pour the warm mixture into the egg yolks, whisking constantly, then scrape the warmed egg yolks back into the saucepan.
Stir the mixture constantly over medium heat with a heatproof spatula, scraping the bottom as you stir, until the mixture thickens and coats the spatula. Pour the custard through the strainer and whisk it into the malted milk mixture. Stir until cool over an ice bath.
Chill the mixture thoroughly in the refrigerator, then freeze it in your ice cream maker according to the manufacturer's instructions. As you remove the ice cream from the machine, fold in the chopped malted milk balls.

Sunday, September 6, 2009

Not Your Grandmother's Lemon Chiffon Cake...or is it?


Baking coverage of our family reunion continues this evening with this INCREDIBLE lemon chiffon cake. Having decided that I would be making one rich chocolate dessert, I needed to find a light, non-chocolate dessert to complement it. This was easier than it sounds, thanks to the amazing blog 17 and Baking. It is by a girl who is 17, and yes, she bakes. And takes beautiful photographs. She makes me feel very under-accomplished, sort of like Michael Phelps does.

In any case, this ended up being my grandmother's birthday cake- hence, the extraordinarily wit-less title of this post. I really like baking with lemon, but I had recently been burned by a lemon pound cake that went all wrong, so I hadn't used any in over two months. Luckily, this cake was well worth the venture. It was unbelievably light, delicious, and simple to make to boot. I was in the minority, but I liked it even better than the chocolate cake (though they went well together, tanks to the citrus in the chocolate cake.) Plus, it allowed me to zest lemons, one of my favorite activities. I'm definitely going to make it again, and maybe I'll try some of the variations she mentions at the bottom of the page. Here's the recipe; this one is a definite recommend!

Lemon Chiffon Cake
Makes one 7″ cake
From Martha Stewart Living

3/4 cup cake flour
1/4 tsp baking soda
1/4 tsp salt
3/4 cup plus 1 tbsp sugar, divided
3 large eggs, separated, room temperature
1/4 cup vegetable oil
1 tbsp lemon juice
2 tbsp grated lemon zest (about 4 lemons)
1/2 tsp vanilla extract
1/3 cup water
1/4 tsp cream of tartar

Preheat the oven to 325 degrees.

In a medium bowl sift together the flour, baking soda, salt, and 3/4 cup sugar. Set aside.

In a large bowl, whisk together the three egg yolks, oil, lemon juice, lemon zest, vanilla, and water. Stir in the dry ingredients.

In an electric mixer, beat the three egg whites on medium speed until foamy. Add the cream of tartar and beat on high until soft peaks form, 1-2 minutes. Gradually add the tablespoon of sugar, beating on high for about 3 minutes until stiff peaks form.

Stir 1/3 of the egg white mixture into the batter, then use a rubber spatula to gently fold the remaining 2/3 into the batter. Pour into an ungreased 7″ tube pan and smooth the top with the spatula. Bake 45 minutes or until a skewer poked into the cake comes out clean and the top is golden.

Cool the cake upside down by inverting the pan onto a bottle. Let cool to room temperature, at least 2 hours, before running a knife between cake and pan and inverting onto a plate. Dust with powdered sugar and serve. You can also split the layers horizontally and fill with lemon curd, or pour a glaze over the cake. It’s also delicious with fresh fruit or ice cream.

Le Fabuleux Glorieux


Oh hai. Remember us? We used to have a blog here. It's been a long time, since I've been on vacation and Rebecca's been...I don't know, petulantly refusing to blog until I do. Whatever. There still has been lots of baking happening, and now you get to read about it.

So the first couple of days of our vacation were devoted to a family reunion. Said reunion was in celebration of both my aunt and uncle's 30th anniversary and my grandmother's birthday. (I could be all coy and say "I won't tell you how old she is," but you're going to find out on the next posting anyway because the number of her age is written out with candles. She's 85.) We went to a yummy restaurant that was BYOB, and, in our case, BYOC. In other words, I was drafted as a cake slave.

As avid readers of the blog know, I loved/was inspired by the movie "Julie and Julia," so I decided to make my first-ever attempt at a Julia Child recipe. I went for "Le Glorieux," a chocolate cake with a hint of orange from pg. 495 of Mastering the Art of French Cooking Volume 2. She described it as a "very rich, very light chocolate cake" (whatever that means); the secret is the use of cornstarch instead of flour.

The recipe was long and detailed but not very hard to follow. The only consistent problem I had was with thickness; she writes that certain concoctions, like the melted chocolate-butter-orange mixture, should have the consistency of mayonnaise. No matter how much I stirred it over ice (her suggested remedy for thinness), it didn't have the consistency of mayonnaise. Yet although she insisted that the thickness was vital, it didn't seem detrimental to the cake.

In fact, the cake was a big hit. I iced it with the powdered sugar buttercream frosting from pg. 681 of Volume 1, which was pretty much just butter so I had to add some other stuff. I also had to refrigerate it and it didn't really have time to thaw before I took the icing spatula to it. Although the whole process was a little messy it gave it a kind of neat marble effect in the end. Everyone really liked it, although the orange taste was a little strong for me. I prefer my chocolate to be unadulterated. But I figured out what Julia Child meant by "very rich, very light." The taste was indeed rich, but the texture was not overwhelming and didn't fill you up in that uncomfortable way that rich cakes usually do. It was a fun and successful first Julia Child recipe (though I don't think I'm going to pull a Julie Powell any time soon).
Related Posts with Thumbnails